If your Computer interferes with System Interrupts high CPU usage, you may face a hardware or driver issue. In this post, we explain what System Interrupts is and how you can find and fix the underlying cause of System Interrupts high CPU usage.
When it comes to managing your computer’s resources, CPU usage is a critical factor that everyone considers. But what happens when you notice an unusually high CPU usage by something called “System Interrupts”?
It can be both confusing and alarming. This comprehensive, SEO-optimized guide aims to explore the causes of System Interrupts high CPU usage, its function, and the potential benefits of system interrupts, to give you a better understanding of what’s going on.
The Function of System Interrupts
Real-Time Task Management
System Interrupts play a key role in managing real-time tasks, ensuring that all hardware and software components can communicate effectively without causing a system crash.
Resource Allocation
By pausing certain tasks and initiating others, system interrupts make efficient use of the CPU, ensuring that urgent tasks are given priority.
Before diving into the issues, it’s important to understand what System Interrupts are. In the realm of computing, System Interrupts act as signals to the processor, indicating that immediate attention is needed for a particular task. They essentially interrupt the ongoing processes to direct the CPU to another task, ensuring that all tasks are executed without clashing with each other.
What is System Interrupts?
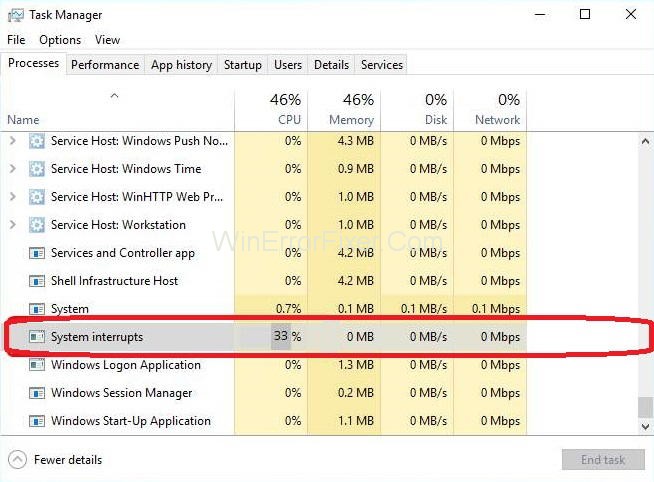
System Interrupts an important part of Windows, and even though it appears to be a process in Task Manager, it is not a process if you look at it in the traditional sense.
Instead, it is an aggregate placeholder which is used for the display of the system resources that are used by all of the hardware Interrupts that are happening on your Computer system.
Hardware Interrupts make up the core part of any PC. They are also used for effective run and management of many activities simultaneously.
Numerous processes are executing continuously on the Computer Interrupts which are used as a mechanism to execute some important instructions just like that by the suspension of activity of any other processes, or they are used to alert the CPU by processes that they are ready to be executed.
However, it’s primary use on your machine, and in the operating system, the processing system Interrupts must not go beyond 2-3% in any normal situation.
Although there will be a problem if the process will jump to around 20% and will stay there, such issues can be easily traced back to some external device, poorly configured driver and fast boot, etc.
Causes of High CPU Usage by System Interrupts
Understanding why System Interrupts are consuming a high percentage of your CPU is crucial in resolving the issue. Here are some common causes:
Driver Issues
Outdated or corrupt drivers can lead to high CPU consumption. Update your drivers regularly to mitigate this issue.
Hardware Problems
Faulty hardware components can trigger an excessive number of interrupts, causing high CPU usage.
Software Conflicts
Conflicting software can interfere with the proper functioning of system interrupts, which can increase CPU usage significantly.
Resource-Intensive Applications
Running multiple resource-intensive applications can overload the CPU, leading to high System Interrupts activity.
How to Fix System Interrupts High CPU Usage
This guide contains all the possible solutions to System Interrupts High CPU problem. Start from the first one and work down until one of the methods works for you. The complexity of the methods increases as you go down. Let’s begin!
Solution 1: Troubleshoot Devices and Drivers
First of all, you should diagnose where exactly does the problem lie. Devices generally drive system Interrupts with a few software exceptions (all covered in the above section) or by bad drivers.
Let’s start by disconnecting all the external devices and then we will move on to the internal devices. You will also have to update the device drivers every time. Disconnect all the external devices, including the keyboard, mouse, foreign WiFi cards, external Bluetooth devices, etc.
Disconnect the devices one by one and keep an eye on the CPU usage all the time. If it stays the same, then you can continue disconnecting rest of the devices, but if the CPU usage lowers down greatly (Approx 2-3%), then it means that you have found the culprit.
But in case you were not able to detect the faulty external device, you can jump on to the internal devices and see if the problem lies with them. It is to be kept in mind that this step is a little trickier than the previous one as it does not include just unplugging of the devices.
For this step, you have to disconnect the devices one by one using the device manager. To complete this step, follow the instructions given below:
Step 1: Press the Windows + R key combination to open the Run dialogue box.
Step 2: Type devmgmt.msc in the dialogue box and then press the Enter key.
Once in the device manager, start Disabling devices and check the CPU usage by system Interrupts after Disabling each device. If the CPU usage does not change and remains stable at 20-30%, then it is a sign that the disabled device is not the cause of the problem and you can carry on doing the same to other devices.
Note: Avoid Disabling the important devices of your system, for example, disk driver, processor, display adapters, anything under Computer or system device categories.
Now, update the device drivers of all the devices connected to your computer. Again, this step is tricky, as well as time-consuming. This step is necessary because automatic driver updates are not to be relied upon, which is why it is essential to update them manually.
There is one way to ensure that a particular device is not the cause of the problem – update the driver to the latest build available and see if you see any difference.
Note: Download the latest driver version from the manufacturer’s official website only.
Steps to update your driver are:
Step 1: Right-click on the device you wish to update and then click on the Update device driver option.
Step 2: Now, choose the second option of Browse my Computer for driver software.
Solution 2: Disable USB Root Hubs
The USB Root Hubs is not plugged in USB peripheral like a physical device. Instead, it is a software device which enables you to connect multiple USB peripherals to your PC. Majority of the Computers have multiple USB Root Hubs so that you can share the data bus across various devices.
To disable the USB Root Hubs which is not in use by your mouse and keyboard, first of all, you have to determine which USB Root Hubs is being used. Firstly, you will determine that, and after that, you will disable all the extra root hub so that it will fix the System Interrupts high CPU usage.
Steps to do the same are:
Step 1: Press the key combination of Windows + R key to open Run app.
Step 2: Now, type devmgmt.msc in the Window that has appeared and then press the enter key.
Step 3: Now, expand the Universal Serial Bus Controllers category and then locate all of the root hubs enlisted there.
Step 4: Then, right-click on the root hub.
Step 5: Now, click on Properties.
Step 6: After the properties open up, open the Power tab and then see if your devices are attached there. Your keyboard and mouse will show up there if they are using that particular root hub. If it is so, you can disable all of the other root hubs with this one as the exception.
Step 7: Once the root hub used by your keyboard and mouse has been identified, disable all of the other root hubs by simply right-clicking on them and then choosing Disable option.
Step 8: Restart your Computer system and then check if the issue has resolved. If it hasn’t disappeared, then you are free to revert all the changes.
Do Not Miss:
- What Is Msdia80.dll, Should You Delete msdia80.dll
- What is CTF Loader and How to Fix ctfmon.exe File Errors
- What is The Akamai NetSession Client and How to Stop It?
- What is SppExtComObjPatcher.exe, Is Your Windows is Pirated?
- What Is Vulkan Runtime Libraries? Should You Remove It?
Solution 3: Disable Audio Enhancements
Some sound drivers use enhancements to improve sound quality. If these properties do not synchronise with the Computer or are not compatible, it will lead to some serious issues like the System Interrupts high CPU usage that you are currently experiencing. You can try to disable the audio enhancement and then see if the CPU usage improves.
It is to be noted that all of the sound drivers do not perform this function. These sound drivers have the Enhancement tab renamed to sound blaster. In this case, you have to try to disable all of the effects of the audio.
Some of the sound drivers also seem to have an issue with the option of “Exclusive mode” that allows other apps to take full control of the sound card although it is likely that this is not the issue, there is no harm in checking if this fixes the problem.
Step 1: Press the Windows + R key combination to open the Run dialogue box.
Step 2: Type Control Panel in the dialogue box that appeared to open Control Panel.
Step 3: Once the Control Panel opens, you will see a search bar at the top right side of your screen. Type sound on it.
Step 4: After the sound option opens, click on the audio device that is connected to the PC and right-click and then click on Properties.
Step 5: Then move to the Enhancement tab and then Uncheck all the enhancements that are enabled.
Note: You can also check the box that says “Disable all enhancements”.
Step 6: Finally, click the Advanced tab and then Uncheck the exclusive mode where applications are enabled to override the settings. Then save the made changes and exit.
Note: If this method didn’t work feel free to undo all the changes you made.
Solution 4: Disable the Wake on Magic Packet Settings
Windows comes with a feature where the network adapter has the privilege to awake your Computer system upon transmission of data. The Computer system calls it the data packet “Wake on Magic Packet”.
It is to be noted that this feature is known for causing System Interrupts high CPU usage issues because it seems that a lot of Interrupts are generated and the Computer system corresponds to each of them. You can try to disable this option from the settings. In case this step doesn’t give any good results in your situation, you can disable it any time later on.
Step 1: Press the Windows + R key combination to open the Run app on the system.
Step 2: Type devmgmt.msc in the Run dialogue box and then press the enter key.
Step 3: Your Computer’s device manager will open. In the device manager, you will see a list of all the devices connected to your computer according to the categories. Now, click on the option of Network Adapters to open the drop-down menu that contains further devices.
Step 4: Select your Ethernet and WiFi device and then right-click on it and finally click on Properties from the options available.
Step 5: Then go to the Advanced tab. You will find a lot of options there. Move to the end of the list where you will find the option of Wake on Magic Packet. Its value will be enabled. Choose Disabled, save the changes and then exit.
Step 6: Reboot your system and see if the System Interrupts High CPU problem has been fixed.
Solution 5: Installing Intel Rapid Storage Technology
Intel Rapid Storage Technology provides improved reliability and performance for systems that are equipped with SATA disks for mobile, desktop and server platforms. It is a Windows-based application.
While using one or more SATA disk drivers, you can take advantage of it’s lower power consumption and enhanced performance. While using more than one disk, the user can increase protection against any data loss in the event of disk failure. Some users observed that installing the Intel Rapid Storage Technology module resolved their issue of System Interrupts high CPU usage.
Its installation is a simple process. However, it is to be noted that it will replace the SATA controller driver on the Computer. If you are familiar with the mechanics, you can install the module from the official website of Intel. Once the product is successfully installed, you will see its icon in the taskbar.
Solution 6: Turn off Fast Startup
The Fast boot or Windows 10’s Fast startup works like the hybrid sleep mode of the earlier versions of Windows. It brings together the elements of the hibernate feature and a cold shutdown. When the user shut down the Computer, Windows logs off all of the users and also closes all of the apps similar to the cold boot.
At this point, the state of the Windows is similar to earn it is freshly booted up (all the apps closed and all of the users logged off). Although the kernel is loaded up already and the system session is running.
After this window sends a notification to the device drivers for preparing for hibernation to save the current system state to hibernation and the Computer is turned off. When the user restarts the system, Windows won’t reload the kernel, the drivers or system state. It will just refresh the RAM with the loaded image in the hibernation file and then navigate you to the Startup screen.
You can try to disable this feature because it does not shut down the Computer entirely in the normal way as one would expect. Many users found out Disabling this feature resolved the problem of System Interrupts high CPU immediately.
Step 1: Press the Windows + R key combination to open the Run app.
Step 2: Type Control Panel in the dialogue box.
Step 3: Once the Control Panel opens, click on the Power Options.
Step 4: After the Power Options open, select the Choose what the Power buttons do option present at the left side of your screen.
Step 5: Then, you will see an option that requires administrative privileges. This option is named as Change Settings that are currently available. Click on this option.
Step 6: Now, Uncheck the box that says Turn on fast startup, at the bottom of your screen. Save the made changes and then exit.
Step 7: Reboot the Computer system and see if the problem has been resolved.
Why is System Interrupts Taking Up 60% CPU Usage?
A sudden spike up to 60% in CPU usage by System Interrupts is certainly alarming. This could be indicative of:
- Severe Driver Conflicts: Outdated drivers conflicting with system operations.
- Malfunctioning Hardware: Components like your hard drive or graphics card could be failing.
- System Glitches: Sometimes, a simple reboot can resolve this issue, as it might just be a temporary glitch.
Benefits of System Interrupts
While the term “interrupt” may sound negative, there are inherent benefits to this process:
- Efficiency: System Interrupts allow the CPU to tackle multiple tasks efficiently by prioritizing them based on urgency.
- System Stability: By ensuring that all tasks receive the CPU attention they need, System Interrupts contribute to overall system stability.
How to Resolve High CPU Usage
- Update Drivers: This is often the most straightforward solution.
- Check for Malware: Run a complete malware scan to rule out malicious activities affecting your CPU.
- Hardware Diagnostics: Use built-in or third-party diagnostic tools to identify hardware issues.
Similar Posts:
- Service Host Local System High Disk CPU and Memory Usage
- Antimalware Service Executable High CPU Usage
- Avast Service High CPU Usage
- Ntoskrnl.exe High CPU, Disk Usage
- Windows Modules Installer Worker High CPU
Conclusion
System Interrupts High CPU usage could be the result of various situations. You must diagnose the root of the problem correctly. Go through the guide with an alert mind as even a small mistake can lead to various serious problems.
Take proper care while Disabling Hardware as well Software. Make sure you undo the changes if they didn’t rectify the situation. Hope this guide proved useful and removed the System Interrupts High CPU usage issue for you.
System Interrupts serve an essential function by managing and prioritizing CPU tasks. However, an unusually high CPU usage can be a sign of underlying issues that need immediate attention. With a better understanding of the causes, function, and benefits, resolving the high CPU usage issue becomes a more manageable task.


