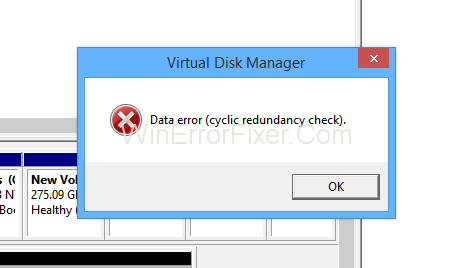
Cyclic Redundancy Check or simply CRC is a check performed by the file system to check if the source file and the destination file are the same. It checks whether the file is successfully copied or not.
Some checksums are generated and then they are compared to see if the files are the same. You might face this issue while copying data from one drive to another.
Two things can be wrong with copying the data:
1. The source file or the Drive on which the file was stored is corrupt. OR, the destination drive is corrupt leading to no match in source and destination files.
2. If the files that gave data error Cyclic Redundancy Check messages are not important, you can delete them permanently and copy the rest of the files.
In the world of digital data, ensuring data integrity during storage and transmission is paramount. One of the tools used to verify data integrity is the Cyclic Redundancy Check (CRC). This article delves into the concept of CRC, the reasons behind CRC errors, and how to resolve them.
What Does Cyclic Redundancy Check Data Mean?
A Cyclic Redundancy Check (CRC) is an error-detecting code that’s used to detect changes to raw data. It’s commonly used in digital networks and storage devices such as hard drives and CDs.
CRC helps ensure that the data you’re reading or receiving is the same as the data that was originally written or transmitted.
What Causes the Cyclic Redundancy Check Data Error?
The appearance of a CRC error suggests that data, during transmission or reading, has been compromised. The primary causes include:
- Bad Sectors on a Hard Drive: Over time, sections of a hard drive can become unreadable, leading to CRC errors when data stored in these sectors is accessed.
- Noisy Transmission Channels: For data transmitted over a network, interference or noise can corrupt data packets, resulting in CRC mismatches.
- Faulty CDs/DVDs: Scratches, dust, or other physical damage on optical discs can cause CRC errors during data reading.
- Faulty Hardware: Damaged storage or network hardware can intermittently produce CRC errors.
- Software Issues: Sometimes, software or firmware bugs can lead to incorrect CRC calculations.
How to Fix Cyclic Redundancy Check Data Error
Solution 1: Repairing the Whole Drive
Command Prompt can be used to repair the drive using the popular command called chkdsk. Chkdsk is a built-in Windows utility. it is used to check and repair file system error. It also repairs the broken file registry and bad sectors.
Follow the steps to repair the drive:
Step 1: Firstly, close all the running programs.
Step 2: Then, open Command Prompt as an administrator.
Step 3: After that, press Windows key + R to open the run option.
Step 4: Type cmd. Press ctrl+ shift+ enter. This opens the command prompt in administrator mode.
Step 5: Type “chkdsk /fd:” without quotes. Replace d: with driver letter of the drive. Then press enter.
Step 6: Now chkdsk utility will run. Now, check for the driver’s errors.
Step 7: After the utility completes the scan and repair, it will display a report about the condition and errors.
There is a high chance of copying the files without the data error Data error (cyclic redundancy check) message popping up. Format the files if there are many errors in the drive.
Solution 2: Recover the Source Files
There are many data recovery software available on the internet. When you delete or move or overwrite a file from any storage device, the special hidden file. It contains metadata about the files and folders simply delete its entry.
The recovery software makes use of this. It rebuilds the metadata file, making the deleted or corrupted file available again. You can copy files without the data error Cyclic Redundancy Check message. Follow the steps given below to recover the files:
Step 1: First of all close all the running programs.
Step 2: Secondly, run the software as Administrator.
Step 3: Select the drive you want to recover files from. Even select the file types you are going to recover.
Step 4: Finally, start recovering after setting the destination. Now you are set.
Solution 3: Format the Corrupted Drive
Formatting the drive will erase everything. So backup all the files before proceeding. Follow the steps given below:
Step 1: Open this PC or Explorer from the Start menu.
Step 2: Right-click on the drive icon you want to format.
Step 3: Click on the Format.
Step 4: Deselect a quick format. In case, you want to clean the drive thoroughly.
Step 5: Choose NTFS if the drive is hard disk or FAT32 in case of pen drives or memory cards.
Step 6: Complete the format.
Solution 4: Renaming the Drive (Assigning A Drive Letter) Iif a Drive Is Not Accessible
You can rename or assign a drive letter to the drive to access it. Follow the steps to assign a drive letter to a drive:
Step 1: First of all, press Windows + R to open run option.
Step 2: Then, type “diskmgmt.msc” in the box. Press enter.
Step 3: Now, the Disk management tool window will open. If you see the drive right-click on it.
Step 4: Following this, select change drive letters or paths.
Step 5: Now, check if there is any drive letter associated. Then select change or select add if there was none.
Step 6: After that, assign a new letter to drive.
Step 7: Lastly, close the windows and reboot.
Solution 5: Check for Bad Sectors on a Hard Disk
If you find the source or destination drive corrupted. Then its time to replace it or get a warranty replacement, if it is still under warranty. To check the bad sectors on a hard disk, use tools like Recuva, Minitool or easeUS.
Follow the steps given below:
Step 1: Firstly, open the tool. Then right-click on the drive you want to scan for bad sectors or damage.
Step 2: Secondly, select the option which resembles like scan for bad sectors.
Step 3: Following that, the large drivers will take a lot of time to scan.
Step 4: Subsequently, if the computer freezes during the scan, wait for a while. But if the frozen stays for a long time then the drive is beyond repair.
How Do I Fix Cyclic Redundancy Check in CMD?
To resolve CRC errors on a hard drive using Command Prompt:
- Press
Windows + R, typecmd, and pressEnter. - In the Command Prompt, type
chkdsk X: /fwhereXis the drive letter you want to check. - Press
Enterand let the process run. The/fparameter will fix any errors it finds.
How Do I Check My Cyclic Redundancy Check?
CRC values are automatically computed and checked by the system or application involved in data storage or transmission. For manually checking CRC values:
- Many file archiving tools, like 7-Zip or WinRAR, have built-in CRC value displays for the contained files.
- Some file transfer protocols and software display CRC values for transmitted files.
- There are also specialized software tools and utilities available for calculating and comparing CRC values for files.
What is Cyclic Redundancy Check Code?
The CRC code is essentially a string of bits derived from a set of data. This code is generated by a mathematical formula that takes into account the bits in the data.
When the data is read or received, the CRC code is recalculated and compared to the original CRC to check for changes. If the two CRC values don’t match, it’s an indication that the data has been altered, either due to corruption, damage, or tampering.
Recommended:
- Audio Services Not Responding
- Firefox Not Responding
- What is Inetpub Folder and How to Delete It
- Err_Connection_Timed_Out
Conclusion
Cyclic Redundancy Check (CRC) serves as a sentinel, guarding against data inconsistencies during storage and transmission. Recognizing CRC errors and understanding their origins is the first step in ensuring data integrity.
Regularly checking hard drives for bad sectors, using error-free transmission channels, and ensuring physical media remain damage-free can significantly reduce the occurrence of CRC errors. In the digital age, CRC is one of the many tools that keep our data trustworthy.
If software reports bad drive then try to replace the drive. We hope that the methods given above will help to fix the issue of data error Cyclic Redundancy Check.


.)