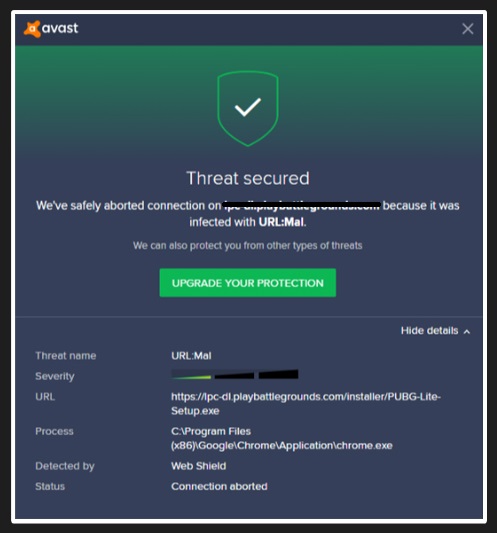
When you are using antivirus like Avast, AVG, and others on your device, then at certain times, while visiting some websites, you may find a warning to warn you about the website that you are visiting. URL:MAL is used to detect those websites and the harmful viruses there.
When you find such a message and the antivirus blocks your browser from opening that particular website, there is no further need for trouble.
Still, if you are a skeptic and if you feel that your device might be harmed, then there are measures that can be taken to remove any malware that might have made its way to your device.
If you’ve encountered the “URL:MAL” warning while browsing the internet or scanning your system, you might be left puzzled and concerned.
Read Also:
- Focus on Enhancing the Relationship with Your Husband
- How to Turn On Bluetooth On Windows 10
- Download YouTube Videos
This article will explore what URL:MAL signifies, delve into the causes of a URL:MAL error, and guide you on how to effectively deal with an infected URL:MAL warning. Knowing what you’re dealing with is the first step in ensuring your online safety.
What is URL:MAL?
Definition
“URL:MAL” is a specific warning message that typically appears in antivirus programs or browser security features. It is designed to inform you that the URL you are trying to access or that exists on your system has been flagged as malicious.
Threat Level
The URL:MAL warning is a serious alert that should not be taken lightly. It indicates that the link is potentially harmful and could expose your system to malware, ransomware, or phishing attempts.
Causes of URL:MAL Error
Various reasons can trigger a URL:MAL error:
Malware Infection
One of the most common causes is that the URL in question is serving or distributing malware, such as viruses, worms, or Trojans.
Phishing Sites
Sometimes, the warning is triggered by URLs that are phishing websites attempting to steal personal information.
Exploit Kits
The URL may contain an exploit kit designed to exploit vulnerabilities in your browser or system software.
False Positives
Rarely, legitimate websites might be flagged incorrectly due to aggressive security settings in your antivirus program.
How To Remove URL:MAL
Method 1: Use Malwarebytes to remove the URL:MAL
Malwarebytes has always been a popular option as an antimalware device for Windows. It is free of cost, and it can detect and remove malware that other software will miss. If your device is possibly infected, then using Malwarebytes seems to be one of the best options which one can opt for.
It has been in the market for many years, and that is not without good reason. You have to try it out yourself to believe how good this antimalware software is. It is compatible with Windows.
When you install Malwarebytes, you will be given a free trial of the premium version. It lasts up to 14 days. Now the premium version obviously includes some extra features. Once your free trial expires, you will still have the free basic version, which is pretty good too.
It can detect and remove malware from your device, but it won’t do it automatically. It will only work if you initiate the scan. It runs smoothly too. Now the following step by step guide will help you to start a scan and remove malware from your device –
Step 1: Download Malwarebytes.
Step 2: Then install it. (You can check your downloads to find the downloaded file of Malwarebytes. Double-clicking on it works for installing it).
Note: It might happen that you are presented with a pop-up confirmation screen asking you that if you will allow Malwarebytes to make changes to your device. If that happens, then you should press yes and confirm it}.
Installing Malwarebytes
The follow-up steps to install Malwarebytes is not so difficult to understand. Just agree to their terms and conditions and install it.
Step 1: Once you have finally finished installing the Malwarebytes, it will automatically update the antivirus database. You can have a quick scan by clicking on the button ‘Scan Now’.
Step 2: The next step is to wait for your scan to complete. Give it some time. Malwarebytes will detect all the harmful malware present on your system, including harmful programs.
Step 3: After the scan is complete, you will be given a list of all the harmful malware and programs detected by Malwarebytes. To remove all of the pesky and harmful malware, all you need to do is press the ‘Quarantine Selected’ button.
Step 4: Malwarebytes will directly remove all the listed malware from your device, and just to finish the process off, it is advised to reboot the computer once.
This comes to the end of the first solution. Of course, there are other ways to get rid of malware from your computer. You can check out the next step too.
Method 2: Use Hitman Pro to scan for malware and unwanted programs
Hitman Pro is a second opinion scanner. It scans the activity of the files that are active on your device and also checks the places where malware is generally found, creating problems for the user.
Since it is a cloud-based scanner, whenever it finds any suspicious file which is unknown, it directly sends it to the cloud to be checked by two very popular and very famous antiviruses, namely – Bitdefender and Kaspersky.
This one is not free software. It costs about 24.95 dollars per year. Moreover, only one computer can access this at the given rate. The scans are not limited.
You can also enjoy the one-month free trial before committing to the software for a year. To use Hitman Pro for scanning malware and unwanted programs and then finally to remove it, you must follow the following steps:
Installing Hitman Pro
Step 1: Download Hitman Pro, and when it has finished downloading, double click on the downloaded file (usually found in downloads) to install it.
Step 2: You’ll get two options – you can either opt for the ‘hitmanpro.exe’ for the 32-bit version of Windows, or you can choose the ‘hitmanpro_x64’ for the 64-bit version of Windows. You will get the pop-up question of whether you will allow Hitman Pro to make any changes to your device. Click on Yes to confirm that pop.
Step 3: The next step is simple. Follow the guides and prompts step by step to install Hitman Pro. After that, the home screen will open. Click on the ‘Next’ button to start a scan.
Step 4: Wait for the scan to be completed. Hitman Pro will detect all the malware on your computer. It will take a few minutes.
Step 5: After it has been completed, a list of all the detected malware will be displayed on the screen in the form of a list. Click on the ‘Next’ button to remove all those malware.
Step 6: Activate the 30-day free trial next by clicking on the ‘Activate Free License’ button.
Method 3: Reset the Browser Settings
If by any chance, your PC gets redirected to the URL:MAL, then you need to reset the browser to the original default that they had. For different browsers, there are different steps to be followed, and we will be going through them one by one.
Google Chrome
Resetting Google Chrome is really easy. It won’t remove your bookmarks or passwords, so that is a positive feature. It will just reset the unwanted changes caused due to the fact that you installed other programs. Follow the steps to reset Google Chrome –
Step 1: Go to Google Chrome and open the settings. (Click on the main menu button and from the drop-down menu, select the ‘Settings’ option)
Step 2: The settings will open on your screen. Just scroll down to the very bottom of the menu. Click on the ‘Advanced’ link present there.
Step 3: This will open the advanced settings tab. Navigate to the ‘Reset and Clean Up’ section and click on the ‘Reset settings to their original default’ option.
Step 4: A configuration box will appear. Click on the ‘Reset Settings’ button. And that’s it! This will reset your Google Chrome completely.
Mozilla Firefox
The reset feature can fix many issues even if it seems useless at first. Resetting Mozilla Firefox will not remove your essential personal information like bookmarks and passwords. If you want to reset Mozilla Firefox because you are facing problems, then you need to follow the following steps –
Step 1: Open Mozilla Firefox and then navigate to the main menu button, and from the drop-down menu that appears, you need to select the ‘Help’ option.
Step 2: Select ‘Troubleshooting Information’ from the menu that appears.
Step 3: After a moment, the Troubleshooting information box will open. Go to the top right corner of the screen and from there, click on the ‘Refresh Firefox’ button.
Step 4: A confirmation box will appear on the screen. Select Refresh Firefox once again to confirm the process.
Step 5: After this, Mozilla Firefox will go back to its default settings.
Note: This will save the old Firefox profile on the desktop. Save it with the name ‘Old Firefox Data’. You can easily remove it or keep it or restore it if you want. We recommend deleting it.
Internet Explorer
Yes, we know that no one uses Internet Explorer nowadays. However, you can face problems if you have it on your device. So it’s better to not take any risks and reset this one too. You can reset Internet Explorer by following the steps given below –
Step 1: Open Internet Explorer on your device. Go to the settings icon and click on it. Select ‘Internet Options’ from the menu.
Step 2: When the Internet Options dialog box opens. Click on the Advanced settings and then click on the reset button.
Step 3: Once the reset internet explorer section opens, all you need to do is select the ‘delete personal settings’ checkbox and then proceed to the next step by clicking on the Reset button.
Step 4: Once the reset is complete. You can close the configuration box. Close the Internet Explorer next and then reopen it to see the changes.
Microsoft Edge
This is only for those who have updated to the Windows 10 Fall Creators Update (Version 1709). Those users can configure the Microsoft Edge settings very easily. It’s a simple process, and if you pay just a little bit of attention, then it will seem like child play.
Some of you may be new to this term, but it’s nothing complex. To reset Microsoft Edge to its default settings, you need to follow the following steps:
Step 1: Right-click on the Start Button and select the ‘Apps and Features’ option. You will get the list of ‘installed programs on your device’ on the screen.
Step 2: Find Microsoft Edge and click on it. When it opens, find the Advanced option and click on it too.
Step 3: When the advanced settings tab opens, scroll down, and navigate to the Reset option. Click on it to reset Microsoft Edge.
Step 4: Double-check for malicious programs with Zemana AntiMalware.
Zemana Antimalware is another popular antivirus scanner. It is very good at removing viruses and malware that other good antivirus or antimalware devices will overlook.
The previously mentioned Malwarebytes and Hitman Pro are also excellent Antimalware devices, but if you don’t like them or want a third option, then you can look out for this one. That’s the main reason for including this on the list. Follow the steps to detect and remove malware from your device.
Installing Zemana Antimalware
Step 1: Download Zemana Antimalware. Go to the Downloads folder. There you will find the downloaded file of Zemana Antimalware.
Step 2: Double click on it to install it. Once again, you will be asked in the pop-up question box whether you will allow Zemana Antimalware to make changes in your device. Click on yes.
Step 3: Follow the prompts, which are easy enough for a novice to understand to complete the installation process. Once you reach the ‘Select Additional Tasks’ screen, opt-out from the ‘Enable Real-Time Protection’ option. Click on ‘Next’ to finish installing.
Step 4: When Zenama Antimalware starts, you will require to perform a scan. Click on the scan button to start the scan. The process of scanning will take a few minutes since the antimalware will try to detect all the malware present on your device.
Step 5: After the complete scanning, you will get the list of all the malware that the Zemana Antimalware detects on your device. Click on ‘Next’ to get rid of the pesky malware.
Step 6: After removing the malware, restart your computer to complete the process. It is kind of like coming to a full circle. Restarting the personal computer may seem to be a little outside the point but it helps in completing the process and making sure that all the malware has been completely removed from your computer.
How Do I Get Rid of an Infected URL:MAL?
Eliminating the threat of URL:MAL requires a systematic approach:
Step 1: Quarantine or Block
The first thing to do upon encountering a URL:MAL alert is to quarantine the URL using your antivirus software, or block it using browser security features.
Step 2: Full System Scan
Run a full system scan with a reputable antivirus software to ensure no malware has been downloaded onto your system.
Step 3: Update Software
Keep your system, browser, and security software up to date to mitigate the risk of vulnerabilities that malware could exploit.
Step 4: Check Network Settings
Make sure your firewall settings are robust and that you are not connected to insecure Wi-Fi networks that could be compromised.
Step 5: Contact the Website Owner
If you suspect that a legitimate website has been wrongly flagged, contact the website owner to confirm the issue. If it’s a false positive, report it to your antivirus vendor for reevaluation.
Step 6: Professional Help
If you find it challenging to eliminate the URL:MAL warning, you may need to seek professional assistance.
Read Also:
Conclusion
It must be very frustrating to deal with malware and viruses on the computer but with new technology, it becomes easier and easier to protect your computer. We hope that you have given the above-mentioned steps a try and that they have proved to be helpful to you.
If by any chance, even after trying all the above-mentioned steps and processes, you still face problems removing URL:MAL alerts, then we suggest that you should ask for help in the Malware Removal Assistance for Windows forum. We sincerely hope that this article did you some good and helped you understand the URL:MAL alerts.


