An integrated platform for Android development is available through Google’s official platform, Android Studio. A developer tool for creating market-leading apps and speeding up performance. This utility is available for download and use on Windows, Mac OS X, and Linux.
If you try to launch the AVD, you’ll get an error notice that says, “emulator: error: x86 emulation currently requires hardware acceleration” (Android Virtual Device). It’s unfortunate, but the issue may be present in Android Studio operating on Windows 7 (Windows 8) as well as Windows 10.
If you’re experiencing the same issue, you may benefit from the following suggestions.
When working with Android emulators, you may have come across an error message stating “Emulator: Error: x86 Emulation Currently Requires Hardware Acceleration!”
This SEO-optimized article aims to break down the causes of this error and offer comprehensive solutions. We’ll also delve into whether hardware acceleration should be enabled on Android devices and explain what hardware acceleration mode is.
What is Hardware Acceleration Mode?
Before diving into the error itself, let’s discuss what hardware acceleration means. Hardware Acceleration Mode refers to the process where specific tasks usually run by the software part of a computer (the CPU) are offloaded to the hardware part (like the GPU).
This enhances the efficiency and performance of the system, especially for graphics-intensive tasks and applications.
Causes of “Emulator: Error: x86 Emulation Currently Requires Hardware Acceleration!”
Understanding the root cause of an error is the first step to resolving it. Below are the key causes for this error message:
- Outdated Software: An outdated Android SDK or emulator software could lead to this error.
- Improper Configuration: Incorrect emulator settings can sometimes trigger this error.
- Hardware Limitations: Older machines might not support hardware acceleration features, leading to this error.
- Virtualization Disabled: This error may also occur if the CPU Virtualization setting in your BIOS is disabled.
Solution 1: Start by Turning Off Hardware-Assisted Virtualization in Avast Antivirus Software
Avast’s hardware-assisted virtualization may interfere with Android Studio’s AVD, according to some users, which could explain why x86 emulation in Android Studio currently necessitates hardware acceleration. Disabling this option in Avast may help you fix the problem.
Read Also:
- Sims 4 Stuck on Loading Screen
- Windows 10, Version 1903 – Error 0xc1900223
- File And Print Sharing Resource Is Online But Isn’t Responding To Connection Attempts
Step 1: To begin, go to Avast’s main menu and select Settings from the drop-down menu.
Step 2: Select the Troubleshooting tab under the General category.
Step 3: To proceed, simply uncheck the box. Hardware-assisted virtualization can now be utilised.
Restart your machine and open Android Studio after removing hardware-assisted virtualization in Avast Make sure that the issue has been resolved before moving on. If it’s still a problem, it’s time to move on.
Solution 2: Installing the Intel HAXM Module.
We already know that the PC must meet Android Studio’s system requirements in order to execute the programme. Other than system requirements, the Android Emulator requires Intel HAXM 6.2.1 or later versions to run.
You may see an error message like “emulator: Error: x86 Emulation currently requires Hardware Acceleration” without the HAXM module installed in your AVD.
You must download and install the HAXM module using the SDK Manager in Android Studio in order to fix the issue. You simply need to:.
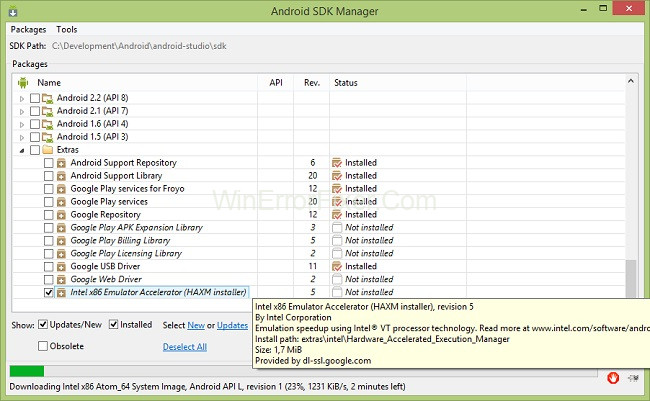
Step 1: Once you’ve opened Android Studio, go to the SDK Manager by clicking File, Settings, System Settings, and Android SDK.
Step 2: Select the SDK Tools tab in Step 2. As soon as you’re done, select Intel x86 Emulator Accelerator (HAXM installation). The HAXM installer can then be downloaded by following the on-screen directions.
Step 3: This is the third step. The installer can be found by pressing Win + E to enter the File Explorer. It is saved in the following location by default:
C:\users\username\AppData\Local\Android\sdk\extras\intel\Hardware Accelerated Execution Manager\intelhaxm-android.exe
Step 4: Install the HAXM module by double-clicking intelhaxm-android.exe and following the onscreen instructions.
To see if everything is back to normal, simply restart Android Studio. Keep attempting the next option if this doesn’t work.
Solution 3: Windows Hypervisor Platform Enabled
It’s possible that the Windows Hypervisor Platform on your PC is disabled if you’re running Android Studio on an AMD CPU with virtualization features (such as Ryzen). If you have access to the Windows Hypervisor Platform, you can try enabling it.
Step 1: To open the Run window, press Win + R. Click OK after typing appwiz.cpl into the box to rapidly access the apps and functions.
Step 2: In the left pane, click Turn Windows features on or off.
Step 3: Confirm your changes by checking the Windows Hypervisor Platform box and clicking OK.
You can then restart your computer and use Android Studio again. As a workaround, you may need to enable the hardware virtualization function in your BIOS or UEFI settings to fix the “emulator: error: x86 emulation now requires hardware acceleration” issue.
The specifics of how to enable hardware virtualization may vary depending on the motherboard and CPU used. While your computer is booting up, pay attention to the message that appears as soon as the manufacturer’s emblem pops up. Alternatively, you can look for the motherboard module and the configuration key online.
How Do I Fix “Hardware Acceleration is Disabled”?
Update Software
- Make sure that your Android SDK and emulator are up-to-date. Outdated software could be incompatible with newer features like hardware acceleration.
Enable CPU Virtualization
- Access your BIOS settings while booting your computer.
- Navigate to the CPU Configuration settings.
- Enable Virtualization and save your changes.
Check Emulator Configuration
- Open your emulator settings and ensure that hardware acceleration is enabled. You can usually find this option under “Advanced Settings.”
Update Graphics Drivers
- Ensure that your system’s graphics drivers are up-to-date. Old drivers may not support hardware acceleration features.
Should I Turn on Hardware Acceleration on Android?
If your Android device supports hardware acceleration and you’re running applications that are graphics-intensive (like 3D games), it is generally advisable to turn on hardware acceleration for smoother performance. However, it can drain the battery faster, so you should weigh the benefits and drawbacks based on your use-case.
What is Hardware Acceleration Mode?
As discussed earlier, Hardware Acceleration Mode allows the hardware of the system to perform certain tasks more efficiently than the software would. In the context of Android emulators, this mode enables the emulator to run smoother, replicating an experience closer to using an actual Android device.
Read Also:
- Astro A10 Mic not Working
- Elden Ring Connection Error
- IMessage Needs To Be Enabled To Send This Message
Conclusion
The “Emulator: Error: x86 Emulation Currently Requires Hardware Acceleration!” can be a major hurdle, especially if you’re actively engaged in Android development or testing. By understanding its root causes and the concept of hardware acceleration, you can better tackle this issue and improve your emulation experience.
This guide has equipped you with the tools to identify, understand, and solve this error, allowing for a smoother, more efficient emulation journey.


