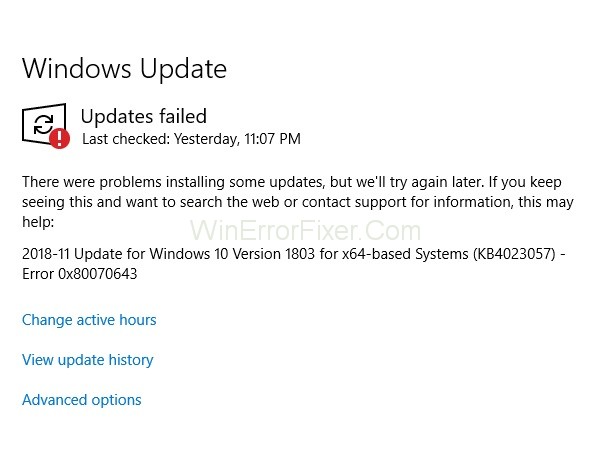
Windows Update Error can occur while updating the Windows system or while installing programs. Error Code 0x80070643 comes with a message “2018-11 Update for Windows 10 Version 1803 for x64-based Systems (KB4023057) – Error 0x80070643“. Or something like this.
Error Code 0x80070643 is a generic error, which means it can occur in different software programs like Microsoft Security Essentials, Microsoft Office, Windows Update, etc. The download of the update happens smoothly but the installation of it is hindered by this error.
This error can happen due to a number of reasons like:
- Due to Undeleted files of previous anti-virus program.
- Due to corrupted files in your system.
We got some solutions for treating Error Code 0x80070643. Some may or may not work for you as Error Code 0x80070643 occurs due to different reasons. So, you have to check all of them to find out which one works for you.
Windows Updates are essential for ensuring that your computer stays secure and runs efficiently. However, errors like 0x80070643 can interrupt this process, leaving users frustrated and unsure of how to proceed.
This article aims to provide an all-encompassing guide to understanding the 0x80070643 error, its causes, and effective ways to resolve it, including cleaning up Windows Update errors and clearing the update cache.
What is 0x80070643?
The 0x80070643 error code commonly appears during the installation of Windows Updates or while installing certain software, especially Microsoft security applications. When you encounter this error, it typically means that the update or installation has failed.
Understanding the causes behind this error can help you diagnose and resolve the issue more effectively.
Causes of 0x80070643 Error
Identifying the root cause of the error is the first step towards resolving it. Here are some of the most common reasons why the 0x80070643 error occurs:
Corrupted System Files
Corrupted files can interfere with the installation of updates, causing this error to appear.
Software Conflicts
Third-party software, particularly antivirus applications, can sometimes conflict with the installation process.
Insufficient Permissions
You may encounter this error if you lack the necessary administrative permissions to install updates or software.
Installation Errors
Sometimes, previous updates or software installations may not complete correctly, affecting subsequent installations and updates.
Outdated .NET Framework
An outdated version of the Microsoft .NET Framework can also lead to this error.
Solution 1: Restart Your Computer
As simple it sounds but many issues including error code 0x80070643 can be solved only by restarting your computer. Restart your PC and then try to install the program again as maybe the previous installation required a quick simple restart.
Solution 2: Disable Antivirus Program
Sometimes the Antivirus software of your PC and Windows update can have conflicts that can result in 0x80070643 error. In this case, you can disable your Antivirus software temporarily and check if you can update your system or not.
The steps to disable the Antivirus are:
Step 1: Right-click on the icon of your Antivirus software and from the given options choose Disable.
Step 2: Also, select the time frame for which you want to disable the program. It is advised to choose the minimum time frame available like 15 or 30 minutes.
Then check if the Definition Update for Windows Defender – Error 0x80070643 error goes away by running the Windows defender.
Solution 3: Restart Windows Installer Service in Your PC
Some defective configurations in the Windows Installer Service of your system may lead to this error code 0x80070643 to appear on the screens. So, restarting the Windows Installer service may solve this error. To do that follow the instructions given below:
Step 1: Press ‘Windows key + R’ on your keyboard.
Step 2: Then type “services.msc” in it and press “Enter” to open the Services window.
Step 3: Now, click on the Windows Installer option and click on ‘Restart’.
Now try to install the Windows updates and see if the problem goes away or not.
Solution 4: Update Windows Defender in PC
You can try to install the updates on your own manually. To install the system updates manually:
Step 1: Press ‘Windows key + Q’ simultaneously and find “Windows Defender”.
Step 2: Then click on “Virus and threat protection” under “Protection areas”.
Step 3: Then find “Virus and threat protection updates” and click it.
Step 4: After that go to the “Check for Updates” button and click it.
Step 5: This will take a few minutes to download the latest updates. Finally, reboot your PC and save the changes.
You can also use the Command Prompt to update Windows Defender in your system. For that:
Step 1: Press ‘Windows + X’ to open a list of options from which choose “Command Prompt (Admin)”.
Step 2: Now type each of the given commands in cmd and press ‘Enter’ after typing each of them:
"%PROGRAMFILES%\Windows Defender\MpCmdRun.exe" - Remove Definitions -All
"%PROGRAMFILES%\Windows Defender\MpCmdRun.exe" – SignatureUpdate
Step 3: After you have entered the commands, it will take a few moments to process it.
Step 4: As it is done close it and reboot your system.
Solution 5: Install the Latest Version of .NET Framework
.Net Framework is important for installing the system updates. So, if the .Net framework on your PC is corrupted or missing then there will be a huge problem in installing the system updates.
So, it is very essential to download the latest version of the .Net framework from Microsoft and installing it on your PC. The steps to download and install it are:
Step 1: First go to Microsoft.Net framework’s official website.
Step 2: Then find the latest version of .Net Framework.
Step 3: Click on the download button.
Step 4: Open the downloaded file and follow the on-screen instructions to install it.
As you complete the installation, run Windows update and see if it installs the system updates or not.
Solution 6: Run a scan now or SFC on your PC
Step 1: Press ‘Windows + X’ to open a drop-down menu from which select “Command Prompt (Admin)”.
Step 2: In the Command Prompt, type “sfc/scannow” and press the ‘Enter’ key.
Step 3: Wait till your PC completes the scan.
Step 4: Now try to install the updates.
The corrupted files present in your PC can be responsible for the hindrance of your Windows in getting updated. You can easy filter these corrupted files in your system through a SFC scan and then replace it.
Solution 7: Perform a clean boot of your PC
Third-party software and programs can arise disagreements with your Windows in your system which can cause this error. So, you need to perform a clean boot of your system and then try to install the Windows updates.
Solution 8: Use Troubleshooting
Step 1: Open the ‘Start menu’ and type “Troubleshoot” in the search box and click on the search box “Troubleshoot” option.
Step 2: Click on the “Run the Troubleshooter” option after extending the Windows Update option.
Step 3: Now, follow the instructions given on-screen and run the Windows Update Troubleshoot.
Step 4: At last, restart your PC and check if it resolves the problem or not.
Solution 9: Use System Restore feature
You can create a system restore point if you are facing this error in your PC. It restores your Windows Operating system back to the time when it was error-free and stable. This will not harm your data or personal information.
But all the drivers and applications that you have installed after that restore point may get vanished.
Solution 10: Reset the Components of Windows Updates to Fix the Issue
Step 1: Press ‘Windows + X’ and then click on “Command Prompt (Admin) from the options given.
Step 2: Type the commands given below and hit ‘Enter’ after typing each one of them. This will stop Windows Update Services:
net stop wuauserv
net stop cryptSvc
net stop bits
net stop msiserver
Step 3: After this, to rename the Software Distribution Folder type the following commands and press ‘Enter’ after typing each one of them.
Ren C:\Windows\SoftwareDistribution SoftwareDistribution.old
Ren C:\Windows\System32\Catroot2 catroot2.old
Step 4: Then type the given commands to start the update services and don’t forget to press ‘Enter’ after typing each command.
net start wuauserv
net start cryptScv
net start bits
net start msiserver
Step 5: Then, reboot your system and check if the error code 0x80070643 goes away or not.
Solution 11: Uninstall the Windows Defender Update
Tracking restore point on Windows 10 Operating system can be difficult because the restore point in it doesn’t exist. But still, if you want to get back to the early state of Windows and remove Windows Defender Update, follow these simple steps:
Step 1: Press ‘Windows + R’ simultaneously which will open the Run window.
Step 2: Now, Type “appwiz.cpl” and press ‘Enter’ to open “Programs and Features”.
Step 3: Then click on the “View Installed Updates” icon displayed on the left side of the screen.
Step 4: In the Microsoft Windows scroll down to search the “Windows Defender or KB4054517 Update” which is the root of this error and click on it.
Step 5: At the last step, click on “Uninstall” and restart your PC. Finally, check if the error goes away or not.
Solution 12: Update using Administrative Permissions
If you haven’t signed-up in your PC and are using it as a guest or from a less privileged account then you should sign in to your system. It is because sometimes, the configuration of the administrative permissions is required for the updates to get installed.
And if your computer belongs to a domain of which you have no details of, call the system administrator for help.
Solution 13: Run SubInACL Tool
There is a bug called .NET Framework 2.0 which happens due to wrong access control list permissions on registry hives which can result in an obstacle for installing some applications.
This bug is usually found in old Windows Operating systems like Windows Vista and Windows XP. To fix this you can use the SubInACL tool which will repair the defected file and registry permissions that are required to install MSI based setups.
Follow the steps to do the same:
Step 1: Download the “SubInACL” tool and install it on your PC. The location of this tool will be: C:\ProgramFiles\Windows Resource Kits\Tools
Step 2: Copy and Paste the given code in a Notepad file.
@echo off
setlocal
echo.
echo Determine whether we are on an 32 or 64 bit machine
echo.
if "%PROCESSOR_ARCHITECTURE%"=="x86" if "%PROCESSOR_ARCHITEW6432%"=="" goto x86
set ProgramFilesPath=%ProgramFiles(x86)%
goto startResetting
:x86
set ProgramFilesPath=%ProgramFiles%
:startResetting
echo.
if exist "%ProgramFilesPath%\Windows Resource Kits\Tools\subinacl.exe" goto filesExist
echo ***ERROR*** - Could not find file %ProgramFilesPath%\Windows Resource Kits\Tools\subinacl.exe. Double-check that SubInAcl is correctly installed and re-run this script.
goto END
:filesExist
pushd "%ProgramFilesPath%\Windows Resource Kits\Tools"
subinacl.exe /subkeyreg HKEY_LOCAL_MACHINE /grant=administrators=f /grant=system=f
subinacl.exe /subkeyreg HKEY_CURRENT_USER /grant=administrators=f /grant=system=f
subinacl.exe /subkeyreg HKEY_CLASSES_ROOT /grant=administrators=f /grant=system=f
subinacl.exe /subdirectories %windir% /grant=administrators=f /grant=system=f
echo FINISHED.
echo.
echo Press any key to exit . . .
pause >NUL
popd
:END
endlocal
Step 3: Then go to “File” and choose the “Save As” option.
Step 4: Type the name as “reset.cmd“. Finally, change the file type to “All Files“.
Step 5: Then, right-click on the script and click on “Run as Administrator“.
Now, wait till the reset.cmd script is completed and after that try to install the Windows updates again.
How Do I Clean Up Windows Update Error?
Cleaning up a Windows Update error involves taking steps to fix and prevent the issue. Below are some steps to help you clean up the 0x80070643 error:
Use Windows Troubleshooter
- Navigate to Settings > Update & Security > Troubleshoot.
- Choose “Windows Update” and then run the troubleshooter.
Check .NET Framework
Ensure that you have the latest version of the .NET Framework installed. If not, download it from Microsoft’s official website and install it.
Disable Third-Party Software
Disable any third-party antivirus software before attempting the update again.
Run System File Checker
- Open Command Prompt as an administrator.
- Type
sfc /scannowand hit Enter. This will scan and repair corrupted system files.
How to Clear Windows Update Cache
Sometimes, simply clearing the Windows Update cache can resolve issues like the 0x80070643 error. Here’s how to do it:
Step 1: Stop Windows Update Service
- Press
Windows + Rand typeservices.msc. - Find “Windows Update,” right-click it, and select “Stop.”
Step 2: Delete Cache Files
- Press
Windows + Rand type%windir%\SoftwareDistribution\DataStore. - Delete all the files in the folder that opens.
Step 3: Restart Windows Update Service
- Return to the Services window, right-click “Windows Update,” and select “Start.”
Step 4: Retry Updating
Now attempt the update again to see if the issue is resolved.
Similar Posts:
- Update Error Code: 0x80004005
- Update Error: 0x80070020
- Error Code: 0xc1900208
- Update Error Code: 0x8024200D
Conclusion
The above solutions are tested and are suitable for all the different ways this error can annoy you. Use it depending on the way this error code 0x80070643 occurs in your PC, hope it helps.
Understanding the 0x80070643 error, its potential causes, and how to clean up Windows Update errors is vital for keeping your system running smoothly.
Clearing the Windows Update cache is often an effective way to resolve this and many other update-related errors. With these tips, you’ll be better equipped to maintain your Windows operating system and navigate around any hiccups you may encounter during updates.


