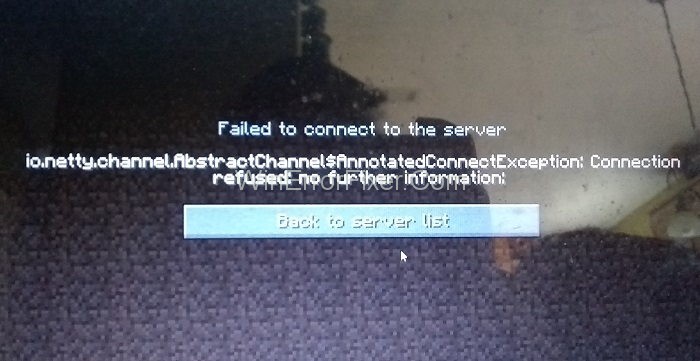
Minecraft is a video game created by Markus Persson. It is a sandbox game that was introduced in 2011 and released by Mojang. Many users are complaining that they are facing the io.netty.channel.AbstractChannel$AnnotatedConnectException:Connection Refused: No Further Information Error on Minecraft.
Actually, when users try to connect to a server, then Connection refused: no further information error occurs.
Minecraft continues to captivate gamers worldwide, offering infinite creative possibilities in a virtual sandbox. However, running a modded Minecraft server or playing with friends can sometimes be a headache.
This SEO-optimized article aims to tackle some of the common issues players encounter, from understanding Netty channels to resolving connection issues and enhancing multiplayer gameplay. Let’s dig in!
What is a Netty Channel in Minecraft?
In the context of Minecraft, a Netty channel is a component of the Netty library, responsible for network communication between players and servers.
Netty is the underlying framework that powers the input-output operations in Minecraft, enabling seamless data transmission. Understanding Netty is crucial for diagnosing connectivity issues, such as when your modded Minecraft server connection gets refused.
What Causes the io.netty.channel.AbstractChannel$AnnotatedConnectException:Connection Refused: No Further Information Error?
We will discuss some of the main reasons behind Connection refused: no further information error. These are given as below:
Reason 1: IP Address Problem: Using the wrong IP address and port for connecting to a server can create trouble. The IP address and correct port forward our connection to the server. After the server’s approval, the link establishes. In the case of Static IP addresses, the IP address remains the same. The same can occur for IDP.Generic and Modern Setup Host.
But if it is not used, then ISP changes IP address from time to time. ISP may allocate the same IP address to different machines. So, in this case, the problem in the Minecraft game appears. That is why it is necessary to edit IP addresses from time to time.
Reason 2: Software Compatibility Issues: Some software is not compatible with Minecraft. If such software is present on your machine, a problem may exist. Minecraft has provided a list of software that is not compatible with it.
Reason 3: Firewall Settings: Windows firewall may be blocking your connection to the server. Java files and game directory should not be present in preventing the list of firewalls. Only then the game will be able to connect to the server properly. Sometimes issue like Digital TV Tuner Device Registration Application Error also appears due to settings of the computer.
Reason 4: Older Version of Java: We know that the Minecraft game requires Java software. Sometimes the software present in your system is not updated. If the game launcher is updated, but Java is not, then the problem may occur. So always install an updated version of Java on your computer.
Solutions for io.netty.channel.AbstractChannel$AnnotatedConnectException:Connection Refused: No Further Information Error
Basic knowledge of the problem helps in finding solutions. Here we will discuss some methods for removing Connection refused: no further information error.
| Number of Solutions | Solution Name |
|---|---|
| Solution 1 | Resetting Internet |
| Solution 2 | Adding Exception in Firewall |
| Solution 3 | Adding the IP Address and Port |
Solution 1: Reset Internet
When we reset our router, then the IP address provided by ISP changes. Following steps are applied for resetting internet settings:
Step 1: Remove the power source from the router.
Step 2: Wait for a few minutes and then reconnect the power source to the router.
Step 3: When the router grants internet access, check if the io.netty.channel.AbstractChannel$AnnotatedConnectException:Connection Refused: No Further Information error still exists.
If this method doesn’t work, then apply other solutions.
Solution 2: Add Exception in Firewall
As we all are aware that there are a number of browsers available. One of them is the Firewall. In Firewall, the browser prevents unnecessary and harmful information to enter your PC. Sometimes the software that is not listed in their trusted software’s list.
So, there is a chance that Firewall may be preventing you from accessing your game. It’s done by blocking you from the main Minecraft server. So, to avoid facing this error, you can go through the following steps:
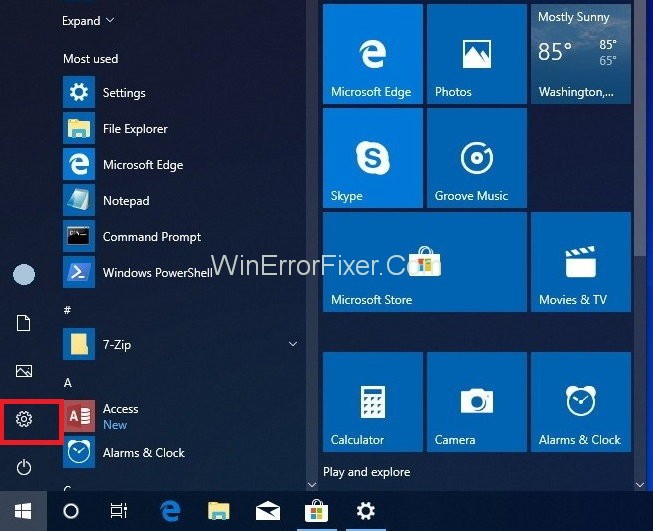
Step 1: Click on the Start menu and select Settings.
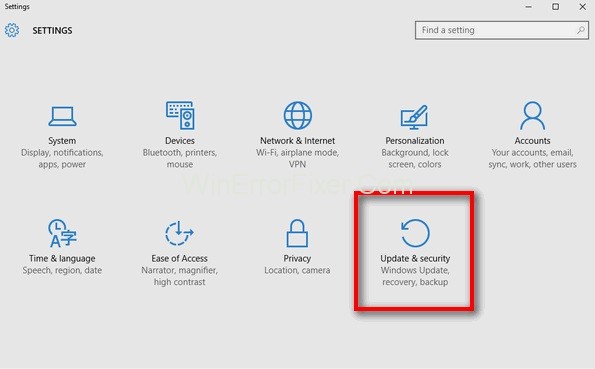
Step 2: Select Updates & Security option.
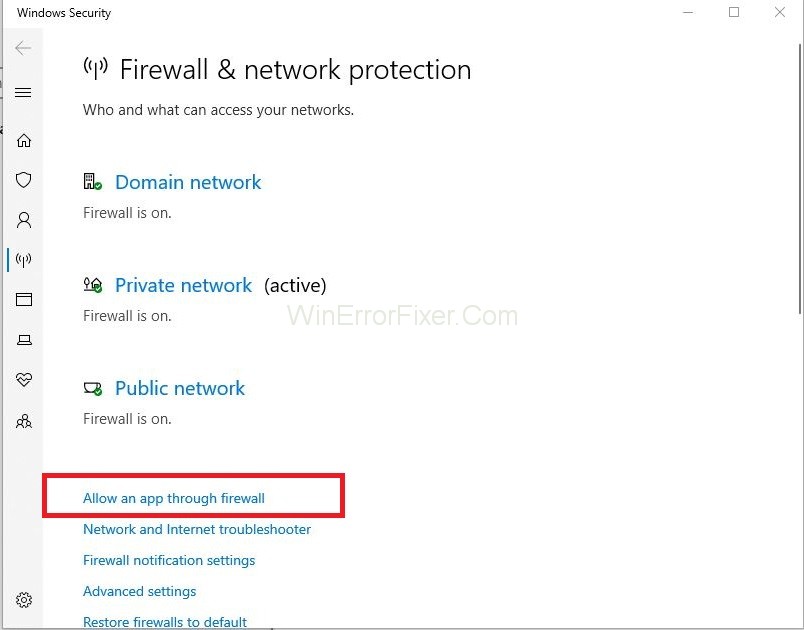
Step 3: From the left pane, select the Windows Security option. After that, select the Firewall & Network protection option.

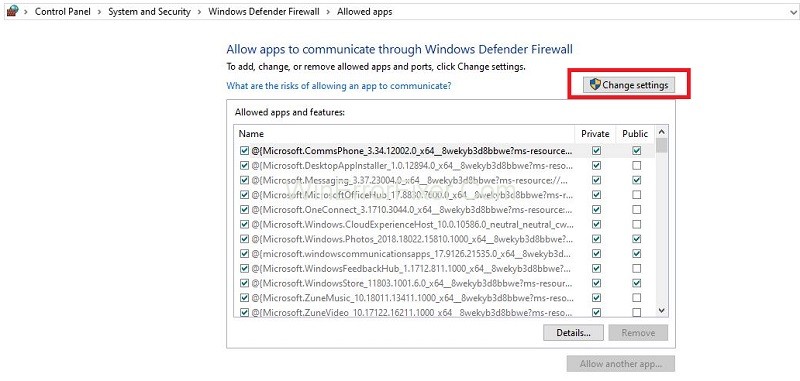
Step 4: Now, select Allow an App through the Firewall option.
Step 5: In the next step, click on the Change Settings option. A warning prompt appears. Select Yes option here (If not then don’t worry).
Step 6: From a list of options, choose to Allow another app and then click on Browse.
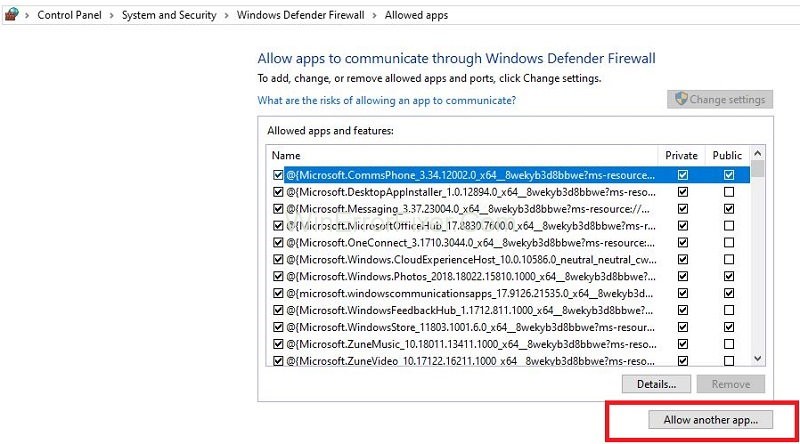
Step 7: From the game installation directory, select the Game and executable launcher files.
Step 8: Repeat the same process. Navigate to the directory where the Minecraft server is present.
Step 9: Open the Maxwell folder and then MinecraftServer folder.
Step 10: Allow Java executables in the same way as we did earlier.
Step 11: Repeat the same process. Allow all the Java Platform SE Binary options through public as well as private networks.
Step 12: After performing these steps, open Minecraft launcher. Now try to connect to the server.
If the io.netty.channel.AbstractChannel$AnnotatedConnectException:Connection Refused: No Further Information error is due to a firewall, then it resolves after applying these steps.
Solution 3: Add the IP Address and Port
In case the IP address is not static, it is changed after a couple of days. It also turns after the internet connection is reset. In this solution, we will check the IP address and port for our game. Add these to Minecraft Launcher by following the given steps:
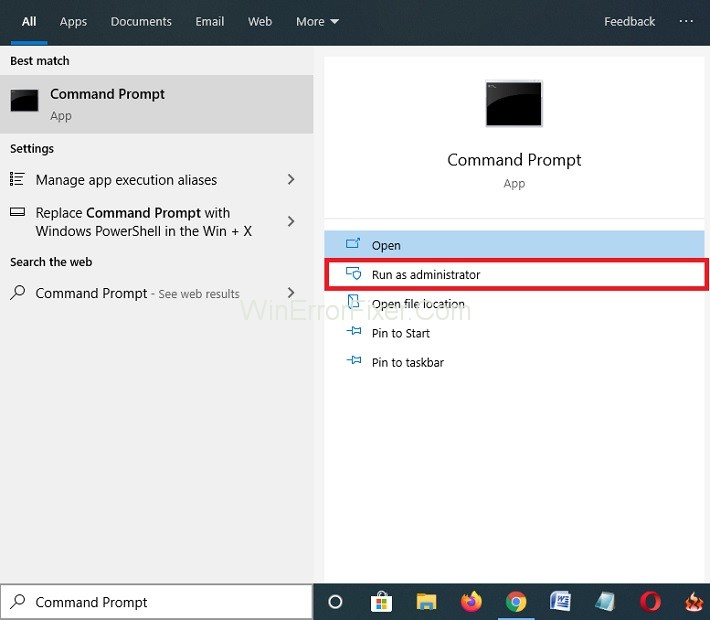
Step 1: Right-click on the Command Prompt icon and select Run As Administrator option.
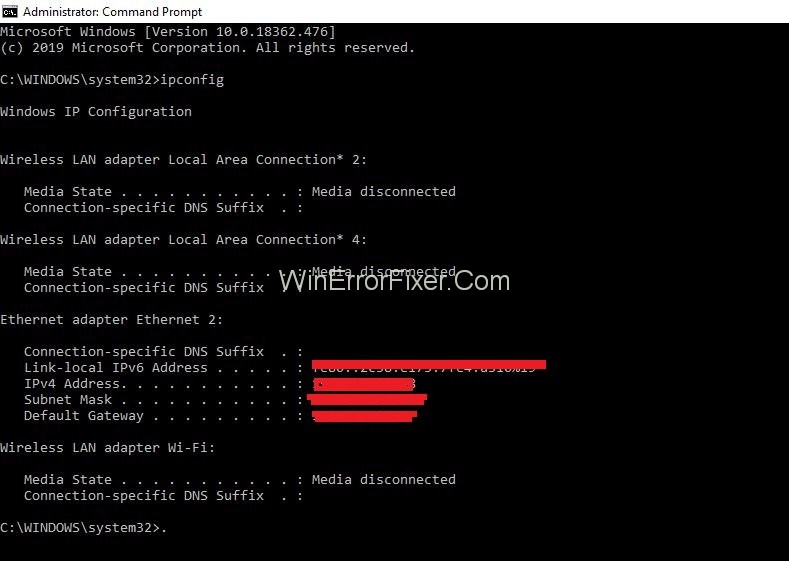
Step 2: Type ipconfig and press Enter. Note down the IPV4 Address. For security reasons our IPV4 is hidden.
Step 3: Navigate to the Minecraft Servers Folder → Maxwell → MinecraftServer. There is a text document named Server Properties. Open this document.
Step 4: Server Port is listed here. It is usually a number. Note it down.
Step 5: After that, open up Minecraft and go through the Play Multiplayer option.
Step 6: Choose the server with which you want to join. Then click on the Edit option.
Step 7: Fill the Server Name according to your preference. Fill the IP Address that we have noted down in Step 2. Fill the server port, as noted down in Step 4.
Step 8: Click on the Done and Refresh button. Again connect to the server. Now check for the problem.
Solution 4: Reset your Modem or Router
In some cases, it is not the browser that is at fault, but it is the modem. If its not working properly, then you will not be able to connect to the game.
To get over io.netty.channel.AbstractChannel$AnnotatedConnectException:Connection Refused: No Further Information error, switch off your router and then try again to restart it. It may resolve your problem.
Solution 5: Using a Trusted VPN Connection
Sometimes, the application (for example, the game in this case) is not listed in the trusted VPN apps list. Then it may come up with this type of error. So, you should use those VPN apps that don’t block the Minecraft Server. To resolve this error, you can try changing the region.
Solution 6: Reinstall Minecraft
If you are still facing this error, then you need to uninstall this application. Try to download it again after some time. This may help you avoid the error.
You can simply uninstall this application by going to the Control Panel. Then clicking on the Uninstall a Program option. To reinstall, you can find the original application on the official site of Minecraft.
Why Is My Modded Minecraft Server Connection Refused?
Connection refusal is a common issue and can be attributed to various reasons:
1. Server Downtime
The server may be down for maintenance or experiencing technical issues.
2. Firewall Restrictions
Your firewall might be blocking Minecraft from accessing the internet.
3. Incorrect IP Address/Port
Make sure you’ve entered the correct server details.
4. Mod Conflicts
Incompatibility between server-side and client-side mods can also result in a connection being refused.
How Do I Port Forward My Minecraft Server?
Port forwarding is essential for making your Minecraft server accessible to external networks. Here’s a simplified guide:
1. Access Router Settings
Navigate to your router’s settings page via a web browser.
2. Locate Port Forwarding Section
Find the ‘Port Forwarding’ or similar section.
3. Add Rule
Create a new rule to forward TCP/UDP ports (usually 25565 for Minecraft).
4. Specify IP and Port
Enter your computer’s local IP address and the port you want to forward.
5. Save and Restart
Save the settings and restart your router for changes to take effect.
Note: The steps can vary depending on the router model.
How to Play Multiplayer in Minecraft TLauncher with Friends
TLauncher allows you to play Minecraft with mods and even join your friends in multiplayer modes. Here’s how:
1. Install TLauncher
Download and install TLauncher on your computer.
2. Open TLauncher and Log In
Run the application and log in using your credentials.
3. Choose Version and Mods
Select the Minecraft version and mods you wish to play.
4. Create/Join Server
Create your server or join an existing one by entering the IP address.
5. Invite Friends
Share your server’s IP address with your friends.
How to Clear Minecraft Cache
Clearing cache can resolve multiple issues, such as lagging or crashes. Follow these steps:
1. Close Minecraft
Ensure Minecraft and its launcher are closed.
2. Navigate to ‘.minecraft’ folder
On Windows, press Win+R, type %appdata%, and navigate to the ‘.minecraft’ folder.
3. Delete Cache Folders
Locate folders like ‘assetobjects’ and ‘assets’ and delete them.
4. Restart Minecraft
Launch Minecraft again; the cache will automatically rebuild.
Note: Clearing cache may remove some settings and options; proceed cautiously.
Do Not Miss:
- YouTube Black Screen
- Taskbar Showing in FullScreen in Windows 10
- Downloading… Do not turn off target
- DNS Server Not Responding on Windows 10
Conclusion
Connection Refused error prevents a user from playing the Minecraft games. We have listed the reasons as well as solutions for io.netty.channel.AbstractChannel$AnnotatedConnectException:Connection Refused: No Further Information error.
In case you encounter Connection refused: no further information error, follow the above methods. Hopefully, the io.netty.channel.AbstractChannel$AnnotatedConnectException: Connection refused: no further information error will fix by applying these solutions.
Understanding the intricacies like Netty channels can be a huge benefit when it comes to diagnosing and fixing Minecraft server issues. Whether you’re dealing with connection refusals, looking to port forward your server, or exploring multiplayer options on TLauncher, this guide should provide you with the solutions you need. And remember, when in doubt, clearing the Minecraft cache can often be a simple fix to various issues.
If you found this article helpful, consider sharing it to help others in the Minecraft community who may be facing similar issues. Sharing quality content enables us to keep providing comprehensive guides on your favorite games.
Thank you for reading!


