Sometimes, when you open the task manager in your device, there is some chance for you to notice .NET Runtime Optimization Service High CPU. The problem appears in a random way but may also take place after an update is installed in .NET Runtime Optimization Service High CPU.
Some users have also experience that it is consuming a large percentage of their CPU resources, each and every time it runs. This may affect system performance. If you never open your task manager, you will never experience it.
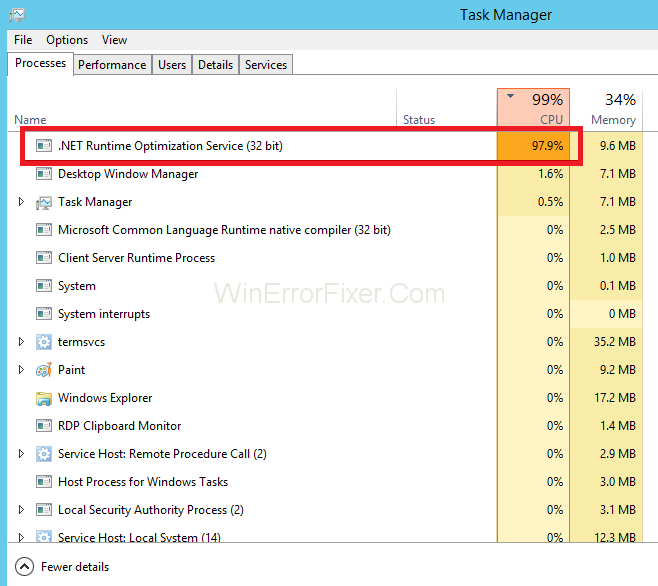
.NET Runtime Optimization Service High CPU is a component of Windows and is also known as Mdcorsve.exe. It can also cause a high CPU when the optimization process takes too long.
The NET Runtime Optimization Service, colloquially known as mscorsvw.exe, is an essential component of the Windows operating system. However, its presence raises numerous questions among users, particularly those who aren’t well-versed in technical lingo.
In this comprehensive, SEO-optimized guide, we’ll demystify what the NET Runtime Optimization Service is, how to change .NET runtime, and the steps for permanently disabling Windows services, including mscorsvw.exe.
What is NET Runtime Optimization Service?
The NET Runtime Optimization Service is a Windows component designed to optimize the performance of .NET applications on your system. It precompiles .NET assemblies in the background, which allows your .NET applications to run faster.
Why is it Important?
- Speeds up Applications: It optimizes the code to run more efficiently.
- Background Operation: Typically runs in the background and uses idle CPU time, meaning it should not affect your computer’s performance.
- Security: As a part of Windows, it has some role in system stability and security.
What causes the .NET Runtime Optimization Service High CPU Usage
On your computer, there may be a running malware which is either camouflages itself as service or the service is infected. You can run antimalware software for scanning. The process now needs to recompile its libraries.
Antimalware software should only run when your computer is idle. It takes too long, some peoples noticed waiting for more than a week but Microsoft states that it will just take a few minutes to complete the progress.
Some reasons for .NET Runtime Optimization Service High CPU are listed below:
- If your computer is running malware disguised as a service, or it is infected.
- If .NET Runtime Optimization Service High CPU is running too slowly.
- If .NET Runtime Optimization Service High CPU is corrupted.
Disabling .NET Runtime Optimization Service is not a solution. If you are also facing the same and want to get rid of it, then follow the methods mentioned below:
How to Fix .NET Runtime Optimization Service High CPU Error
Solution 1: Clean Boot
If a third party app is a reason for the problem, clean it by using a clean boot guide to get rid of it. Clean boot is when a system is using a set of drivers and programs. May some program is causing that issue.
To get rid of .NET Runtime Optimization Service High CPU error, you can perform a clean boot. Follow the steps mentioned below to perform a clean boot:
Step 1: Click on the Start menu, then search MSConfig.
Step 2: Click on the top search result System Configuration.
Step 3: Right-click on it and then select Run as Administrator.
Step 4: Now a new page will open on your screen, click on general boot then selective startup and then uncheck Load Startup item.
Step 5: Move on to Services present at the second right of general, then click on Hide all Microsoft services. Now click on Disable option.
Step 6: Now move on to the Startup option and click on the open task manager.
Step 7: Disable all the applications and then click on Apply.
Step 8: Now Restart it by clicking on the Restart option.
Solution 2: Optimizing the Process
Do not end this process immediately because it may actually help your computer and will improve the way of running programs. It may be good for your computer, so keep patience and wait until the process is completed, but there is a way you can speed up the process.
Let’s have a look at how to increase the speed of the process. You can speed it up by running some helpful commands, or you can try it by running a script having the same effect.
It enables the process to finish quickly by using more CPU cores. If your process will complete quickly, it will save you time. Check the process below to increase the speed of the process:
Step 1: Search for Command Prompt it may present at the right in the Start menu or try tapping on the search button present at the right side of the Start menu. When the results appear, right-click on the result present at the top and then select Run as administrator option.
Step 2: If you are using windows in an older version, you can use the Window Logo Key + R key combination to bring up the Run dialogue box. Then type in cmd in the box and then use the combination of following keys Ctrl + Shift + Enter to run Command prompt as an administrator.
Step 3: After that copy and paste the following commands which are shown below and don’t forget to click Enter key on the keyboard after each one. Choose one command between the first two commands in accordance with your operating system (the first one is for 32-bit and the second one is for 64-bit).
cd c:\Windows\Microsoft.NET\Framework\v4.0.30319
cd c:\Windows\Microsoft.NET\Framework64\v4.0.30319
ngen.exe executequeueditems
Step 4: We are pretty sure that your problem of .NET Runtime Optimization Service has gone to normal. Check your .NET Runtime Optimization Service High CPU Usage for confirmation.
Alternative
You can use the official script of Microsoft in case you are uncomfortable while using commands by yourself or you have an older version of the Windows Operating System. This will do the same thing for you.
Follow the steps mentioned below to use Microsoft Operating System:
Step 1: Visit the link to open the GitHub page of the script.
Step 2: Scroll down the code to choose save link as, after right-clicking on the Raw button. But before you should make sure that the file type is Windows Script File (*.wsf). Just for confirmation.
Step 3: Open the file where you have saved it. Double click on it to run. You can select Windows Script Host in case if you are confused in choosing the program to run it with.
Step 4: Check out if your problem is gone away.
By following the above methods, you would probably have flushed off the issue, but in case it is still stuck, then follow further solutions mentioned below.
Solution 3: Malware Scanning
As mentioned earlier, malware infection can be the main cause of this issue and its vital to check if your computer has malware. If you want to get rid of the malware who are the main cause of .NET Runtime Optimization Service high CPU, you can run anti-malware software.
Malwarebytes and Avast are some examples of Anti-malware software that performs a full scan to find out the malware on your computer. These are the malicious programs that want to build a stronghold on your resources, and they named their processes which are shown as files on your computer.
Scroll down to see how to scan your computer with one of the anti-malware software, namely Malwarebytes, because it shows the best result as it has a vast database.
Step 1: Malwarebytes provides you with a free version to download it from its official website. You just have to buy the trial version to avoid buying it as you don’t need the full suite once your problem is solved.
Step 2: The next step is to find out the file you have downloaded from the website. Find it in the download files of your computer. Once found double click on it open it on your PC.
Step 3: Install the Malwarebytes in the files in which you prefer by following the instructions given by your computer on the screen. Complete your installation process.
Step 4: After the installation is completed, open your Anti Malware application, click on the start menu, and then look for the scan button provided in the application at its home screen.
Step 5: The application will update its virus database by launching it’s updating process, and then the scanning will proceed. The process will take fewer minutes. Keep patience while it’s processing. After scanning if it is showing any detection of malware on your computer, delete it right now by clicking on the delete selected as shown in the image.
Step 6: After the complete process, reboot your computer. If you are still experiencing the same, move ahead to the next solution.
Note: You can choose any anti-malware software of your choice or according to your computer preference.
Solution 4: Restart the Service
You can try restarting the service, and it can fix your problem as it will restart the whole process but this time will not take too much time because if there was any bug, it has been deleted in the previous solution. Follow the steps mentioned below to do so:
Step 1: Use the combination of Windows key + R, press them on your keyboard at the same time to open the Run Utility. When a box opens, type service.msc without any interruption or mark. Click OK when it appears to open the Service tools.
Step 2: Look for the option NVIDIA Telemetry Container Service present on the list. Click on it and select Properties present in the context menu when appeared.
Step 3: Stop the service if it started by clicking on the Stop button present in the middle of the window. Click on Start to run it.
Step 4: Don’t forget to set the option under the Startup type menu in the service’s properties window to automatic before proceeding further step. Mark a tick on dialog box if it appears while changing startup type.
In case you get the following error message while you click on Start:
“Windows could not start the service on Local Computer. Error 1079: The account specified for other services running in the same process.”
If you receive this, follow these steps to get rid of it:
Step 1: Open Service Properties Window by following the 1-3 steps mentioned above. Go to Log on the tab then click on the browser button.
Step 2: Click on the check names under Enter the object name to select and wait for it.
Step 3: Once finished, click on OK and put your password.
How Do I Change .NET Runtime?
Changing the .NET runtime generally involves either updating to a new version or reverting to an older version. Here are the steps to change your .NET runtime:
Updating to a New Version
- Download: Visit the official Microsoft website and download the latest version of .NET runtime.
- Install: Run the installer and follow the on-screen instructions to complete the installation.
Reverting to an Older Version
- Uninstall: Open the Control Panel, go to ‘Programs and Features,’ find the current .NET version, and uninstall it.
- Install Older Version: Download the older version you need from the Microsoft website and install it following the regular procedure.
How Do I Permanently Disable Windows Services?
Disabling Windows services should be approached cautiously, as it can potentially destabilize your system. However, if you’re sure that a specific service needs to be disabled, here’s how you can do it:
- Open Services: Press
Windows Key + R, typeservices.mscand press Enter to open the Services application. - Locate Service: Scroll through the list to find the service you want to disable. For NET Runtime Optimization Service, you’ll find it under ‘Microsoft .NET Framework NGEN’.
- Properties: Right-click on the service and choose ‘Properties’.
- Disable: In the ‘Startup type’ dropdown, select ‘Disabled’.
- Apply and OK: Click on ‘Apply’ and then ‘OK’ to save changes.
Note: Disabling essential Windows services can lead to system instability. Always make sure you know the function of a service before disabling it.
Read Next:
- DISM Host Servicing Process High Disk Usage
- Microsoft Compatibility Telemetry High Disk Usage
- Ntoskrnl.exe High CPU and Disk Usage
- Windows Audio Device Graph Isolation High CPU Usage
Conclusion
We are pretty sure you will get rid of the .NET Runtime Optimization Service High CPU issue by following the above methods. The NET Runtime Optimization Service serves to improve the performance of .NET applications on your system.
Though it usually operates in the background, understanding its function can help you manage your system better. Changing the .NET runtime is usually as simple as installing a different version, while disabling Windows services is more involved and should be approached with caution.
Feel free to share this in-depth guide to help others understand the intricacies of NET Runtime Optimization Service, and how they can effectively manage it on their Windows systems.


