You have recorded a video or filmed a movie, that’s only one half of the battle. The next half is the post-processing stage, i.e., editing the video. This stage requires a good combination of both technical knowledge and creativity.
A lot of people think video editing is a difficult task. But it’s not. Once you understand the basics of editing and get your hands on the right tools, it becomes super easy!
The internet has a solution for everything, even video editing. You can find an online video editor or install editing software. And the skills required to edit videos are pretty easy to learn too.
How To Edit Videos Online For Beginners
This article will make the concept of video editing easier for you with some simple tips and tricks on the same.
1. Using the Right Software
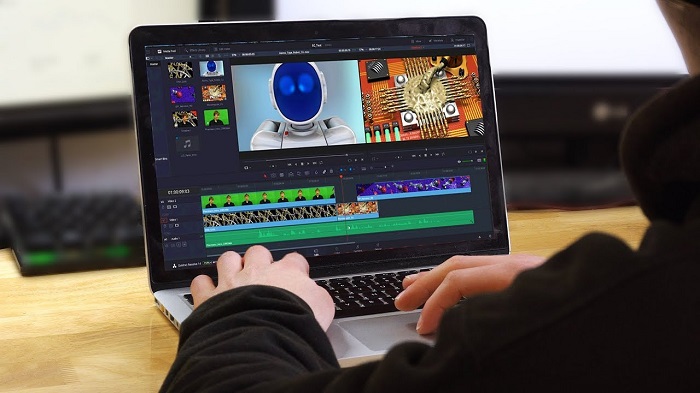
The first step to editing a video is choosing the right editing software for your work. There are several editing software on the internet that perform the basic editing process, but some are better than the others. Instead of opting for the latest or the most advanced editing software, you need to figure out what works best for you and your editing style.
Some of the best editing software are Adobe Premiere Pro, DaVinci Resolve, Corel VideoStudio, Pinnacle Studio, Apple Final Cut Pro X, and Filmora from Wondershare.
Some less popular but useful alternate editing software are Autodesk Smoke, Lightworks, and Sony Vegas.
2. Making a Plan
It is better to start your video editing process with a good plan. Video editing is a pretty tedious task, and without a plan, it can begin to feel burdensome too. If you are familiar with the footage you are about to edit and know exactly how you want to proceed, you will be able to finish the task without any complications.
First, you need to define what you want to accomplish with the clips you are about to edit. You should know the message you want to send to your audience with the video. This will be very helpful in making decisions once you start editing.
Second, you need to be familiar with the footage you have. It’s better to watch it first and get rid of the unwanted clips and shots than watch it over and over again while editing. This will save you time and make the editing process smooth.
3. Creating a Standard Timeline
A timeline is a rough visual representation of what you want your final video to look like. Once you have a plan, you can start editing by placing the clips in an order you wish to in the final video. The timeline is where your final video takes shape.
4. Begin the Process of Editing
Once you have assembled the raw clips in a sequence on your timeline, you are ready to start editing them. You can start removing unwanted content to make the narrative of the video clear.
One of the most common editing tools used is the blade tool. Wherever you place the tool, it will trim and split the clips. Not every software comes with a blade tool. With such software, you will have to grab and drag the heads and tails of the clip to trim it. You won’t be able to split the clips and will have to use multiple instances from it.
Make fine cuts in the clips. Show the audience what’s needed to be shown.
One of the most important things to keep in mind while editing videos is to ensure the flow in the clips. You do not want the audience to get distracted with the breaks in the flow of the video.
5. Splitting the Clips
Splitting the clips into segments can be very useful. Sometimes, a single clip has two crucial scenes in it. Showing these scenes in a successive sequence may not always look good. And letting go of these scenes entirely may not be the best option either. In such cases, what you need to do is split the clip. This way, each scene will be in a separate clip and can be assembled with the rest of the video later.
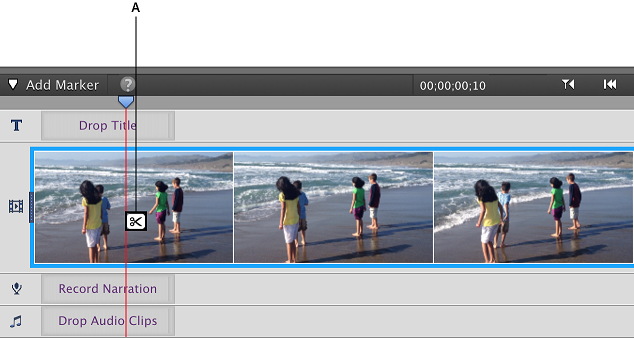
For example, splitting a clip to use a reaction shot in between. If your video is of a cricket match, you can split the clip and place a shot of the crowd’s reaction when the batsman hits a six!
6. Layering
This is a simple and powerful technique used in video editing. Layering lets you overwrite and overlay several clips to create a dense visual narrative. This is achieved by piling two or more clips on top of each other inside the edit.
The previous point talked about splitting the clips. Well, this may not be necessary in every case. You can place one clip on top of another. This will allow you to show the visual of the batsman’s shot while playing the crowd’s reaction audio in the background.
7. Cutting it Down
Video editing is an iterative process of clipping, splitting, and assembling clips. As you keep editing the video, look for ways to cut it down just to the core parts. If there’s a scene that can be removed without compromising on the story and quality of the video, removing it is the best option. This will allow you to send a direct and clear message to your audience.
8. Adding Audio Tracks
Audio is just as important as the visuals in the video. As you go on the process of editing and splitting the clips, give a listen to the clips from time to time. You must make the audio track clear and easily understandable for the audience.
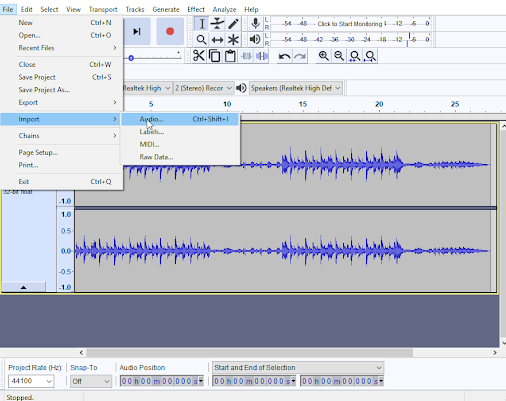
One of the powerful video editing software – Adobe Premiere Pro – offers a range of tools that let you fine-tune the audio while editing. Other smaller and free editing software may not have this option, but they will allow you to adjust the volume of the clips.
You can also use the YouTube video editor for editing videos. It’s available on the platform and is pretty easy to use.
Final Output
Once you are done editing your video, you can export it to the largest video resolution possible. This will ensure the quality of your video is not compromised in any way. But if your video is going on online platforms, you should export smaller and high-quality versions as well.


