Wondering your PC is being slow without any reason, and then you see WSAPPX High CPU Usage. Want to know What it is? And how to fix it! Keep reading the article. This is a Microsoft based service associated with Windows Store.
WSAPPX runs when the user updates, install or uninstall any Windows Store application. Sometimes even after the updates are applied, this service still runs unresponsively in the background and makes your PC slow as a snail.
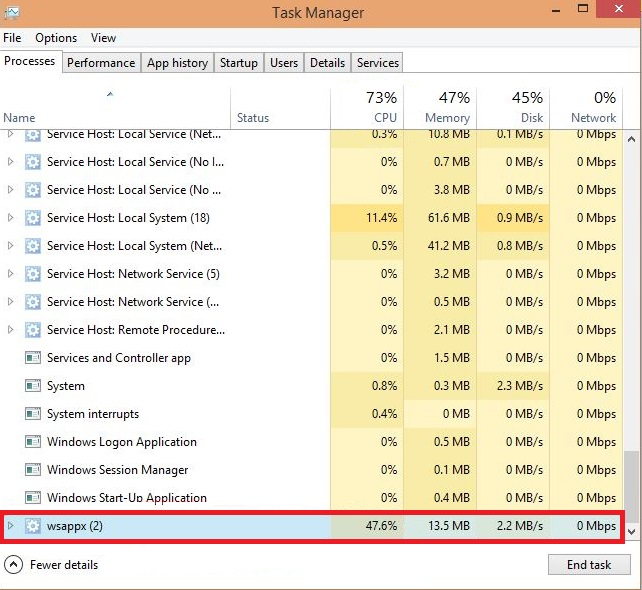
The Windows operating system, brimming with various services and processes, often leaves users with questions. One such element that has garnered attention is WSAPPX, a process that sometimes uses a significant portion of the CPU.
Users commonly ask what WSAPPX is and how they can reduce its CPU usage. This comprehensive guide aims to answer these questions, offering you a detailed look at WSAPPX, its functions, and tips to manage its CPU consumption effectively.
What is WSAPPX?
WSAPPX is a background process associated with the Windows Store and Universal (or Modern) apps on Windows 10 and Windows 8.1.
It plays a critical role in installing, updating, and uninstalling store apps, ensuring they function as intended. Essentially, WSAPPX serves as a bridge between the Windows Store and the applications on your computer.
Components of WSAPPX
WSAPPX encompasses several services, such as:
- AppX Deployment Service (AppXSVC): Manages the installation and removal of apps.
- Client License Service (ClipSVC): Manages licenses for apps and software.
- Windows Store Service (WSService): Found in older versions of Windows, it handles tasks related to the Windows Store.
Why WSAPPX Consuming High CPU?
Since this service is used to Install or perform other operations from Windows Store and consumes resources for those operations, sometimes this service runs in the background due to some reasons and consumes the High CPU even if the user does not install updates or uninstalling an application. In simple words, you can say this service is in a Trance.
How to Fix WSAPPX High CPU Usage
There could be a number of solutions and each solution is for a different cause. There are some common causes for this to occur like applications are automatically updating in the background, due to some faulty drivers it keeps on updating or it could also be a startup problem.
In this article, you will solutions for common causes due to which this service WSAPPX can misbehave. Simply follow the solutions below to fix it.
Solution 1: Restart your Computer
Many times due to a third-party application interference, this problem could occur, and just a simple Restart will be sufficient to fix it.
Restarting or Rebooting the system is pretty easy; just right-click on the Windows section’s Power button and choose Restart.
Note: If it shows An application is running in the background, then click on Forcible Restart /Shutdown.
Solution 2: Update Your Device Drivers
Drivers are needed to be updated on time. But sometimes while updating drivers due to irruption of any other application or by any means if the installation is interrupted it could lead to many problems in this case it is the High CPU usage. In this solution, we will update our device drivers. Simply follow the steps below to update your device drivers.
Step 1: Click on Windows Key and type Device Manager in search bar and hit Enter.
Step 2: Now locate your devices one by one and right-click on them.
Step 3: Select updated driver from the menu.
Step 4: Select the search for updates automatically.
Step 5: If your PC is unable to find a driver then you need to go to the device manufacturer’s website and download it from over there.
If WSAPPX is still taking High usage from CPU. Then you should try out other solutions.
Solution 3: Increase Your Virtual Memory
Virtual memory is a memory management capability of an operating system (OS) – which uses hardware and software to allow a computer to compensate for physical memory shortages, by temporarily transferring data from random access memory (RAM) to disk storage.
Sometimes due to a shortage of virtual memory services like WSAPPX can behave unresponsively. To solve this problem we’ll increase the virtual memory of the system. Simply follow the steps below to increase virtual memory.
Step 1: Press Windows Key and search for Performance. Then select Adjust Appearance vs Performance in Windows.
Step 2: Press the Advanced tab and select change.
Step 3: Uncheck the box saying ” Automatically manage paging file size for all drive.
Step 4: Choose the drive on which Windows is installed.
Step 5: Put the amount of RAM in Initial size and put double of initial size in maximum size.
Step 6: Click OK and Restart your PC.
Now you’ve finally increased your PC’s virtual memory. If virtual memory deficiency was the cause. Then, the error should be solved. If you are still facing the same problem follow other solutions.
Solution 4: Disable the Windows Store
There are many users who do not use Windows Store or it applications. Hence disabling Windows Store is the fastest and easiest way to deal with this problem. There are two methods to disable the Windows Store.
Method 1: Using Group Policy Editor
Step 1: Press Windows Key + R and type ” gpeedit.msc “ then hit Enter.
Step 2: Click on Computer configuration and select Administrative Templates.
Step 3: Then click on Windows Components and select Store.
Step 4: Search for the setting Turn Off Store application in the right panel and then select Edit.
Step 5: Click on Enable and hit Enter.
If you didn’t found Group Policy Editor on your PC you can use the 2nd method.
Method 2: Using Registry Editor
Step 1: Press Windows Key and search for regedit.
Step 2: Then go to HKEY_LOCAL_MACHINE\ SOFTWARE\Policies\Microsoft\WindowsStore key.
Step 3: Now you have to create a new DWORD and assign it a value 1. To do that Right-click on the right panel and select new DWORD.
Step 4: Then rename it to “RemoveWindowsStore”.
Note: if you don’t find any WindowsStore key then you have to create it. Like a subfolder.
Now the Windows Store is disabled WSAPPX service won’t bother you anymore. If you want to use the Windows Store and get rid of the problem then you should try other solutions.
Solution 5: Disable Superfetch and Windows Search
Superfetch is a service that is used to launch applications faster and improve system responsiveness. Many users found this solution very helpful in their cases. Disabling these services won’t affect your system in a way you notice.
Simply follow the steps below to Disable these services.
Step 1: Press Windows Key + R type services and hit Enter.
Step 2: Now scroll down till you found “Superfetch“.
Step 3: Then Right-click on it and choose Disabled in Startup option then click on apply.
Step 4: Repeat steps 2-3 for “Windows search“.
Now you’ve successfully disabled both of these services. Check, and if the problem still exists, you should try other solutions.
Solution 6: Run A System Scan
If any Malware or virus is present in your system it could also trigger this problem of high CPU. By running a system scan (deep scan) on your system,m you’ll find any Malware or virus present in your system. To do a system scan follow the steps below.
Step 1: Open Windows defender or Antivirus.
Step 2: Click on the Deep scan.
Step 3: When the scan completes, choose the appropriate way to remove malware or virus.
If you are still facing the same problem. You should check out other solutions.
Solution 7: Perform a Clean Boot
If any of these solutions didn’t work out for you. You need to perform a Clean Boot. A clean boot will only let important drivers and services to run. This way you can find where the actual problem lies. Now simply follow the steps below to perform a Clean Boot.
Step 1: Right-click the Start button.
Step 2: Click Search.
Step 3: Type msconfig and hit Enter.
Step 4: Click Services.
Step 5: Click the checkbox next to Hide all Microsoft services.
Step 6: Click Disable all.
Step 7: Click Startup and Open Task Manager.
Step 8: Click any startup program you suspect might be interfering.
Step 9: Click Disable. Repeat steps 9 and 10 for all startup programs.
Step 10: Finally Restart your PC.
Now you’ve performed a clean boot now you’ll be able tell what was the cause behind this problem.
Importance of WSAPPX
WSAPPX is essential for the smooth operation of Windows Store applications. Without it, you may encounter issues when trying to install, update, or uninstall these apps. However, it’s not uncommon to find WSAPPX causing high CPU usage, leading to decreased computer performance.
How Do I Reduce CPU Usage on WSAPPX?
Reducing the CPU usage of WSAPPX can help your computer run more efficiently. Here are some effective methods:
1. Update Windows and Store Apps
Keeping your Windows OS and Store apps updated ensures that any bug causing high CPU usage is likely fixed.
- Update Windows: Go to Settings > Update & Security > Windows Update > Check for updates.
- Update Store Apps: Open the Windows Store, click on the three dots in the top right corner and choose ‘Downloads and Updates’.
2. Run the Windows Troubleshooter
The Windows Troubleshooter can diagnose and automatically fix issues that may be causing high CPU usage.
- Go to Settings > Update & Security > Troubleshoot > Additional Troubleshooters > Windows Store Apps > Run the Troubleshooter.
3. Disable Windows Store (For Advanced Users)
If you rarely use Windows Store apps, you can disable the Store to prevent WSAPPX from running. Note that this step is for advanced users and should be undertaken with caution.
- Press
Win+Rand type ‘gpedit.msc’ to open the Local Group Policy Editor. - Navigate to Computer Configuration > Administrative Templates > Windows Components > Store.
- On the right pane, double-click on ‘Turn off the Store application’ and select ‘Enabled’, then click ‘Apply’.
4. Scan for Malware
Sometimes malware can masquerade as legitimate processes. Run a complete scan of your system to rule out this possibility.
5. Check Disk for Errors
Disk errors can also cause high CPU usage. Use the built-in Windows ‘chkdsk’ utility to scan and fix disk errors.
FAQ
Is WSAPPX Necessary?
It is a part of the Windows service. It is used to install, update, or uninstall an application on PC. If you don’t use Store’s applications, then this service is not necessary for you.
Is WSAPPX a Virus?
No, it is not a virus; it is a Microsoft Windows Service. Although sometimes it may act like a virus and uses up resources. But it’s behavior could happen due to many reasons. But it is not a virus.
Can I Disable WSAPPX?
The answer is yes and no both. Because you can temporarily suspend this service but you won’t gonna be able disable it permanently. You can temporarily Disable it by opening task manager and hit End Process.
Conclusion
WSAPPX takes High CPU because it updates applications in the background. At the end of the article, I hope you have found your solution to WSAPPX High CPU Usage.
WSAPPX is an essential Windows process for managing your Store apps but can sometimes consume significant CPU resources. While you cannot entirely disable WSAPPX without affecting the functionality of Store apps, the methods outlined above can help you manage its CPU usage effectively.
By keeping your system updated and performing regular checks, you can ensure that WSAPPX runs smoothly, thereby optimizing your computer’s performance.


