Microsoft has made a large imprint in the progress of OS technology with Windows 10. It has given the best features to keep their users conveniently updated and adjusted to the fast running millennial lifestyle. One of the interesting features that you will find on Windows 10 is the Windows Spotlight but sometimes you will find that Windows Spotlight not Working.
Nowadays most people lead a very fast-moving life-style. So most of them do have time to read the newspaper to update on what new Microsoft products are being released or just look at a beautiful and relaxing picture to freshen up their mood. Well with Windows Spotlight, Microsoft has solved these two problems at once.
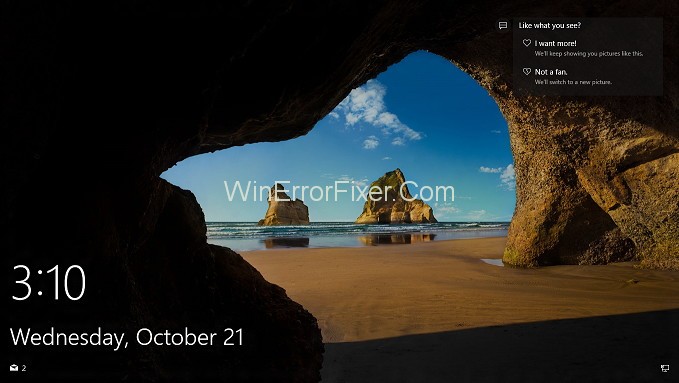
What is Windows Spotlight om Windows 10
Windows Spotlight is a default feature on Windows 10 that automatically downloads and displays pictures or ads from Bing and features them on your Windows lock screen. The pictures are sometimes marked with locations or questions asking whether you liked the picture or if are interested in looking at some kind of pictures or if you want to look into similar ads.
Sometimes you’ll also find an ad link on your screen. This Windows 10 feature beautifies your screen background automatically without much effort from your end. Like every good thing sometimes the Windows Spotlight can also have some downside. Many Windows 10 users have reported that their Spotlight has stopped working properly.
Some have complained that they don’t see any photographs on their screen at all or they find the same photograph as their background every time they switch on their computer. These problems can occur due to several reasons such as corrupted spotlight folder, wrong proxy settings, etc. But the good news is that most of the time these issues like Windows Spotlight not Working can be solved pretty easily.
How to Fix Windows Spotlight not Working Error
Here are some solutions that might help you fix your Windows Spotlight not Working error.
Solution 1: Turn off Metered Connection
Most people tend to use up data fast during the first few days of their plan and regret doing so in the later. So to stop themselves from using up too much data turns on the metered connection option. The metered connection tool helps you to control your data usage and set a limit for daily/monthly data usage.
When your usage nearly hits the set quota, windows stop or disables some of the applications and features to downsize your data usage. Windows Spotlight is one of the features that are disabled. Disabling metered connection might re-enable the Spotlight.
Step 1: First make sure you are connected to a stable internet connection.
Step 2: Go to the Search Bar present on the Windows menu or press the Enter Key + S.
Step 3: Search for the Settings and click on it.
Step 4: The settings dialog box will appear on the screen.
Step 5: Now open the Networks and Internet section.
Step 6: After that Uncheck the box beside/under Set as Metered Connection.
Solution 2: Re-Selecting Spotlight
It is always better to look over and try simple solutions before diving into the more technical or complicated solution. So the first solution that you should try is to re-enable the Windows Spotlight. It happens sometimes that the Spotlight feature stops working by mistake and so it is unable to show any more new pictures. You can simply just enable the Windows Spotlight from settings. This helps to re-configure the tools and start their functions.
Step 1: First go to search bar present on the Windows menu or press the Enter Key + S.
Step 2: Initiate a search for Settings.
Step 3: Now open the Personalization tab.
Step 4: Then from the navigation pane, seek out Lock Screen and click on it.
Step 5: You’ll find a dropdown list on the screen.
Step 6: From the dropdown list select “Picture“.
Step 7: Now once again go to the Lock Screen Settings.
Step 8: Finally select Windows Spotlight from the drop-down list.
Step 9: Close all running applications and restart your PC.
When your PC is restarted, check whether it’s working or not. If the Spotlight isn’t working, you should try out the other suggested methods. You should always keep in mind that the Windows Spotlight doesn’t work without a stable internet connection.
Solution 3: Disable Mail and Calendar from the Lock screen
Enabling mail and calendar updates on your lock screen means that any notification related to your mail or calendar can be viewed on the lock screen. Windows synchronizes this feature with the Spotlight automatically. Normally this doesn’t seem to cause any issue. But sometimes when your utilities stop updating the proper working of the spotlight is also disrupted. To disable Mail and Calendar from the Lock screen.
Step 1: Start the process by going to the Search bar present on the Windows menu or press the Enter Key + S.
Step 2: Type in weather and open the first result on the list.
Step 3: Now open the Settings panel by clicking on the settings icon on the bottom left corner of the screen.
Step 4: Then search for Launch Location under the general tab.
Step 5: Make sure to check the default location box and exit the weather section.
Step 6: Now again go to the Search Bar present on the Windows menu or press the Enter Key + S.
Step 7: This time search for Lock Screen and open the first result you get.
Step 8: Under mail icon you’ll find “Choose Apps to Show Quick Status”, uncheck the box beside it.
Step 9: then uncheck the box the “Show lock screen background on the sign-in screen.”
Step 10: Do the same with the calendar if you want to disable in too.
Now finally restart your PC to find out if you’ve solved the problem, if not then are there are more solutions that you could use.
Solution 4: Delete Spotlight Folder Contents
An overloaded Windows Spotlight data folder might be the reason behind your problematic working of the spotlight. To fix the Windows Spotlight not Working error to can delete and clean out the entire Spotlight content from the system.
Step 1: First disable the Windows Spotlight.
Step 2: Now from the Windows search menu search for Settings and click open the first result.
Step 3: Then go to the Personalization section.
Step 4: After that, you should click to select the Lock screen option.
Step 5: Look through the drop-down list and select Picture from there.
Step 6: A picture will be shown on the screen. Go to the location where the image is stored.
Step 7: Replace the User with the following given profile’s name:
C:\Users\<USER>\AppData\Local\Packages\Microsoft.Windows.ContentDeliveryManager_cw5n1h2txyewy\Settings
Step 8: Make sure you view hidden folders too.
Step 9: Press ctrl+A to select all the content in the folder and finally press Delete.
Step 10: Re-enable the Windows Spotlight.
Restart your PC and look if the changes made any difference. If not then you can also try to clear out the Windows Spotlight assets. To do so follow the below steps –
Step 1: First disable the Windows Spotlight.
Step 2: Follow the same steps as before to go to the location of the image.
Step 3: Replace the User with the following given profile’s name:
C:\<USER>\ibrah\AppData\Local\Packages\Microsoft.Windows.ContectDeliveryManager_cw5n1h2txyewy\LocalState\Assets
Step 4: Press Ctrl + A to select all the content in the folder and finally press Delete.
Step 5: Re-enable the Windows Spotlight.
Solution 5: Disabling Proxy Settings
Windows Spotlight doesn’t work if you are using any proxy settings on your computer to access the internet. This is because the Spotlight doesn’t allow downloading pictures from proxy servers. So you can disable proxy settings to check if the Spotlight starts working.
Step 1: First from the Windows search menu search for proxy and click open the first result.
Step 2: now go to the LAN section and click on the button that reads as LAN settings.
Step 3: Another panel will open.
Step 4: Navigate to find “Use a proxy server for your LAN” and uncheck the box beside it.
Step 5: Lastly Press on OK and then, Restart your PC to check if the Windows Spotlight not Working error is fixed.
Solution 6: Create A Local Account
If none of the above solutions have been useful, you can try to set up a new Local Microsoft Windows account and see if that solves the issue. Doing this might help because it can be that your current account might not have access to the Windows Spotlight feature.
Step 1: First go to the current administrator account and open the account tab from settings.
Step 2: Find the “Family and other users” option and click on it.
Step 3: Now you must select “Add someone else to this PC”.
Step 4: A new window will appear on the screen.
Step 5: Now click on the “I don’t have this person’s sign-in information’ button.
Step 6: Then opt for “Add a new user without Microsoft” option.
Step 7: You fill in all the details asked to make a new account.
Step 8: Now again open settings. Go to Accounts and then /your accounts.
Step 9: Find the option “Sign with a local account instead”.
Step 10: Then enter your current password and username.
Step 11: Finally click on Sign-out to finish the process.
Step 12: Well again open settings. Go to Accounts and then /your accounts.
Step 13: Click on the option “Sign in with a Microsoft account instead”.
Step 14: Put in your password and username to sign in.
Solution 7: Run System Maintenance Troubleshooter
The Windows Spotlight might not work properly because the folder can be corrupted or affected by other corrupted files or folder. In this situation, it is best to run a system maintenance Troubleshooter.
Step 1: Start by selecting Run from the Windows menu.
Step 2: Type in Control panel and then press Enter.
Step 3: Now from the search bar on the control panel, search for troubleshooting.
Step 4: You will find the needed result at the top of the list.
Step 5: To find all the troubleshooters present in your computer system, click on the view all button.
Step 6: Now find and select System Maintenance from the given list on the screen.
Step 7: Then go to the Advanced option to check the box against the run as administrator.
Step 8: Make sure to check on the box beside Apply repairs automatically.
Step 9: After that, the windows will start the troubleshooting process. Be patient until the scanning ends.
Windows will automatically repair the errors found and after the entire process is finished it will restart the PC by itself. If it is still not working then you must definitely give our last below suggestion a go.
Solution 8: Re-register Spotlight
Re-registering should be your last resort.
Step 1: To begin the process open Cortona and settings from the search bar.
Step 2: Now uncheck all the boxes shown on the screen to disable Cortana.
Step 3: Again open the search bar and look for the lock screen.
Step 4: Find and click on the Pictures option.
Step 5: Then close everything running on screen and search for PowerShell in the search bar.
Step 6: Open PowerShell as the administrator.
Step 7: Type the command given below.
dism /online /cleanup-image /restore health

sfc /scannow

powershell

Get-AppXPackage -AllUsers |Where-Object {$_.InstallLocation -like "*SystemApps*"} |

Foreach {Add-AppxPackage -DisableDevelopmentMode -Register

"$($_.InstallLocation)\AppXManifest.xml"}
Step 8: Make sure to check on the box beside Apply repairs automatically.
Step 9: Now enable the Cortana again.
Step 10: Re-enable Spotlight from the settings menu and now Windows Spotlight should be changing by now.
Read Next:
- There Was A Problem Resetting Your PC Error
- Selected Boot Image Did Not Authenticate
- What is Taskeng.exe, Why It Is Keeps Popping Up, Is It A Virus?
- What is Skyrim Civil War Overhaul, Why It Isn’t Available Anymore?
Conclusion
If none of the methods work then you should know that Dynamic Theme is a great alternative for the Windows Spotlight. It has almost all the same features like Spotlight and can be easily downloaded from the App Store or you try to find the free downloadable version from the internet.
We hope that you have given each of the above methods a try till one of them worked to solve the Spotlight issue. If it is still not working then you can give updating the Windows a try. Or if you are exhausted after trying all these methods and don’t want any more hassle, then just go to the Microsoft App Store to download and install the Dynamic Theme application.


