One of the worst and annoying issues with Windows 10 is “Start menu not working” problem. Many people have faced this issue. But you don’t have to worry as the problem can be solved easily.
How to Fix Start Menu Not Working in Windows 10
Many solutions will help you to fix the problem of Start Menu not working. Just follow the below-given solutions one by one and look for the one that works for you:
Solution 1: Relogging Into Your Account
Re-logging into your account is one the quickest and easiest way to fix the problem. To re-log into your account, follow the below steps:
Step 1: At first, press the Ctrl + Alt + Del keys together from your keyboard. Then, click on Sign out.
Step 2: Now, enter your password again to log in.
Step 3: Check if your start menu is working correctly.
If this method doesn’t work for you, try the below methods.
Also Read:
- Err_Cache_Miss Error
- Bad Pool Header
- Windows 8.1 Product Key and Activation
- DNS_Probe_Finished_Bad_Config
Solution 2: Creating A New User Account
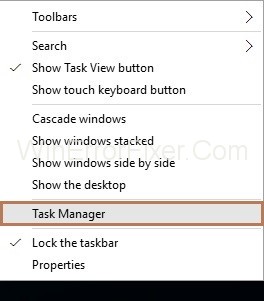
Step 1: Start with a right click on the taskbar at the bottom of your desktop and from the list select Task Manager.
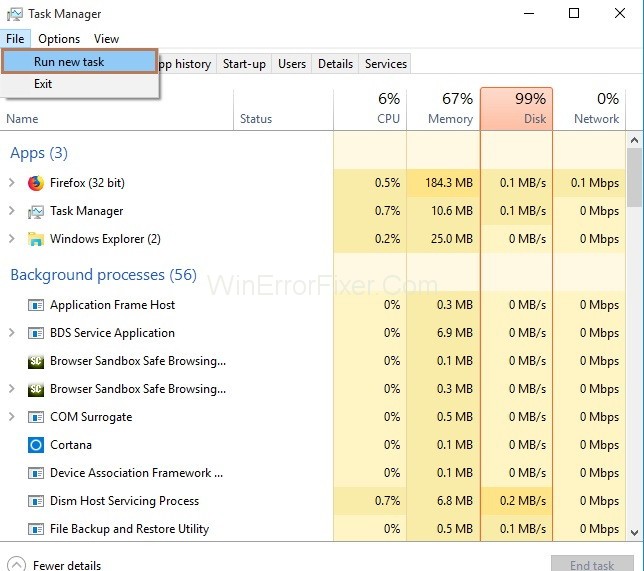
Step 2: From the Task Manager window, click on File option at the top and then select Run new task.
Step 3: Now type PowerShell in the box. Also, make sure to check to mark the box “Create this task with administrative privileges” and press the Ok button.

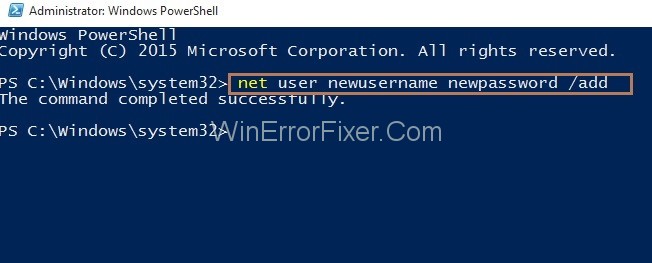
Step 4: Powershell window will appear. Then in the PowerShell PowerShell, paste the following command and press the Enter key: net user newusername newpassword /add
Note: You should set a newusername and the newpassword as per your choice.
Step 5: Now, restart your system and then sign in with the new account created.
Step 6: Now check if your Start menu is working. Also, you can modify your new local account to a Microsoft account. After this, you can transfer your files and settings.
Solution 3: Disabling Antivirus Programs
If your system has antivirus programs such as Norton, Avast, AVG, Kaspersky, etc. then you should try disabling them temporarily to check if they are causing the problem of Start menu not working. Therefore, after turning them off, if your start menu starts working normally, then contact the software vendor to seek their help.
Don’t worry about temporarily disabling the antivirus as Microsoft has its own antivirus program which is Windows Defender. When you have disabled other antivirus programs, Windows Defender is enabled.
Solution 4: Uninstalling Dropbox
Sometimes, Dropbox prevents Start menu from working properly. It conflicts with the Start menu and doesn’t allow you to use all the features of the Start panel.
To uninstall the Dropbox from your system, follow the below steps:
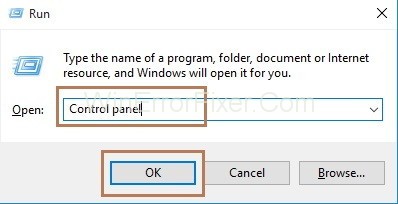
Step 1: At first, press the Windows and R key together from your keyboard to open the Run dialog box. Now enter Control Panel in the box and click on the Ok button.
Step 2: Then, click on Uninstall a program option.
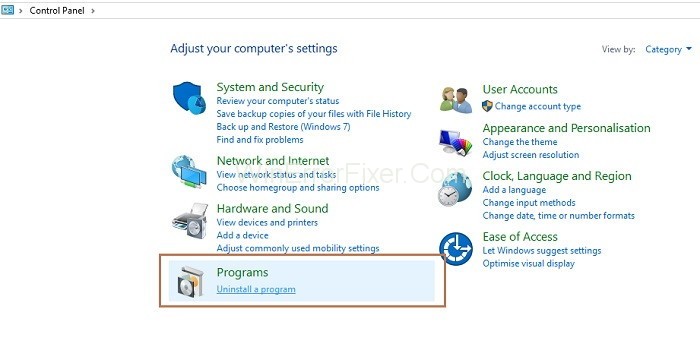
Step 3: From the list, search for the Dropbox application. Then right click it and select Uninstall for removing it from your system.
Solution 5: Checking and Repairing Windows Files
Many times, corrupted system files prevent the Start menu from working properly. But you can fix it by running two in-built system tools. To do, follow the below steps:
Step 1: Start with a right click on the taskbar at the bottom of your desktop and from the list select Task Manager.
Step 2: From the Task Manager window, click on File option at the top and then select Run new task.
Step 3: Now type PowerShell in the box. Also, make sure to check to mark the box “Create this task with administrative privileges” and press the Ok button.
Step 4: Then, enter the command sfc /scannow in PowerShell and click on Enter key from your keyboard. The process will take time to complete, wait for it.
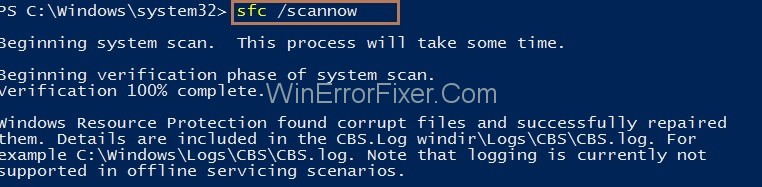
Step 5: After this, enter the following command in the PowerShell and press Enter key from your keyboard. Wait for it to complete.
DISM /Online /Cleanup-Image /RestoreHealth

Step 6: After completion of tests, check if the Start menu is working now.
Solution 6: Running Microsoft Start Menu Troubleshooter
After the updates in Windows, Microsoft identified the problem of Start menu not working, so they introduced Microsoft Start Menu Troubleshooter.
This troubleshooter will check whether Start menu and Cortana are correctly installed and many more things like this.
So you need to install this troubleshooter and now see if your problem is resolved. If the problem is not fixed, follow the next method.
Solution 7: Reinstalling Cortana
You can try reinstalling Cortana to fix the problem of Start menu not working properly. To do this:
Step 1: Start with a right click on the taskbar at the bottom of your desktop and from the list select Task Manager.
Step 2: From the Task Manager window, click on File option at the top and then select Run New Task.
Step 3: Now type PowerShell in the box. Also, make sure to check to mark the box “Create this task with administrative privileges” and press the Ok button.
Step 4: Now, copy the following command from here and paste it in PowerShell and also press Enter after pasting the command:
Get-AppXPackage -Name Microsoft.Windows.Cortana | Foreach {Add-AppxPackage -DisableDevelopmentMo
de -Register “$($_.InstallLocation)\AppXManifest.xml”}
If the command doesn’t work, try the below command:
Get-AppXPackage -AllUsers | Foreach {Add-AppxPackage -DisableDevelopmentMode -Register “$($_.InstallLocation)\AppXManifest.xml”}
Step 5: Thus, Cortana is successfully reinstalled.
Solution 8: Making A Registry Tweak
Before performing this step make a backup of your registry. After making Backup, follow the below steps:
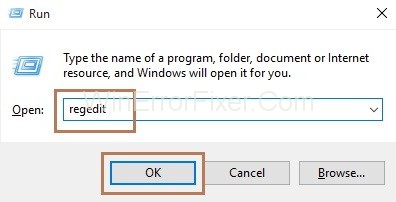
Step 1: At first, press the Windows and R key collectively from your keyboard to open the Run dialog box. Now enter regedit in the box and click on the Ok button.
Step 2: Registry Editor will appear. Now, open the folders in the following order:
HKEY_LOCAL_MACHINE ->SYSTEM ->CurrentControlSet ->Services ->WpnUserService
Step 3: On the right side of the pane, double click on “Start” and then enter the Value data as “4“. Click on the Ok button.
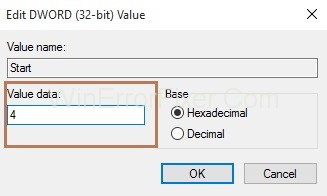
Finally, Restart your system to apply the changes.
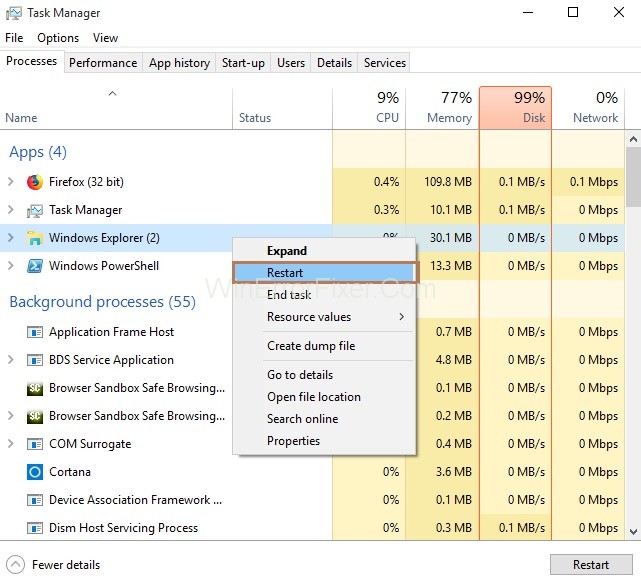
Solution 9: Restarting Windows Explorer
Another simple way to fix the problem is to Restart your Windows Explorer process on Windows 10. To do this:
Step 1: Start with a right click on the taskbar at the bottom of your desktop and from the list select Task Manager.
Step 2: Then, click on the “Processes” tab and search for “Windows Explorer” process. At last, right click on it and choose “Restart” from the list of options.
Solution 10: Running Application Identity Service
There is a service called Applocker which is used by Application Identity Service to determine which applications to run or not run on your system. So, you can force it to run when you are facing the problem of the Start menu as it helps in fixing.
Step 1: At first, open the Run box by pressing Windows and R key together and type services.msc in box. Click on the Ok button.
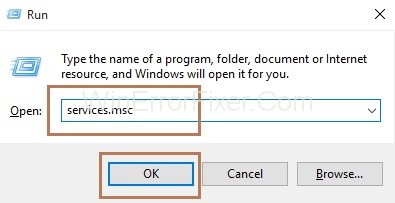
Step 2: Services window will appear and from it right click on the Application Identity and click on “Start“.

At last, Reboot your system and check if the problem still exists or not.
Also Read:


