In this article, we will know what sedlauncher.exe is, how to disable it and fix high CPU usage. Microsoft constantly provides updates to improve the performance of the Windows operating system.
It is used to make sure the Windows operating system and Microsoft related products are updated. These updates usually involve media drivers, audio drivers, service packs, etc. Even though Windows updates were intended to achieve higher system performance.
Nonetheless, these updates are the source of many issues that afflicts the user experience. For example, when the Windows 10 KB4023057 update package was issued, many users faced trouble as it caused their systems to slow down. Sedlauncher.exe is a part of this Windows 10 update service.
Sedlauncher.exe files can cause high disk usage and various issues with Windows 10. It is quite baffling that this file is consuming a high amount of RAM, which results in a low amount of memory for running other programs/tasks like browsing through a webpage or playing a video.
This is why you must understand what sedlauncher.exe is, and how can you resolve this issue on Windows 10?
What is Sedlauncher.exe?
Windows announced that the Sedlauncher.exe file is used to enhance the Windows update service components. This file is facilitated with Windows 10 KB4023057 update patch. To locate this file visit the system directory ‘C:\Program Files’ within the folder ‘rempl’.
Sedlauncher.exe is a component of the Windows Remediation service. It can also cause high disk usage issues. However, it is comforting that the sedlauncher.exe file is digitally signed by Microsoft, which clarifies that this is not a malware/virus infecting your operating system.
In case you could not find the file in the location specified above, try running a full system scan. Malware is known to mask itself as an authorized process and is located in ‘C:\Windows’ or ‘C:\Windows\System32’ folder.
If you don’t have any antivirus software to protect your system, we recommend you download a cybersecurity tool from this link for Windows and scan your system. Windows operating systems, despite their widespread use and robust architecture, are not without their issues.
Problems like Sedlauncher.exe errors, cluttered system files, or the need to disable Windows License Service can cause disruptions. This article serves as an all-in-one guide to understanding these issues and how to effectively deal with them.
What Causes Sedlauncher.exe Error?
Sedlauncher.exe is part of the Windows 10 Update process, specifically related to the KB4023057 update patch.
It helps in enhancing the speed of the Windows Update service on Windows 10. However, it can sometimes cause high CPU usage or other errors. The common causes of a Sedlauncher.exe error can include:
Corrupted Files
If the Sedlauncher.exe file itself is corrupted, this can cause errors. A corrupted file might be the result of an incomplete update or an interference from other software.
Malware Infection
Malware or viruses disguised under the name Sedlauncher.exe can lead to errors and high CPU usage.
Software Conflict
Third-party software running on your system might conflict with Sedlauncher.exe, causing it to malfunction.
Insufficient Resources
If your system is already overloaded, running Sedlauncher.exe can be the straw that breaks the camel’s back, leading to errors or crashes.
How to Disable Sedlauncher.exe?
Now that we know the Sedlauncher.exe is a legit component of the KB4023057 update patch and it has an efficient role in Windows 10 updates. However, if you wish to temporarily or permanently disable it.
These methods mentioned here will guide you throughout the article as to how you can disable this service from using your system’s memory.
Solution 1: Disabling Sedlauncher.Exe from Task Manager
The easiest and most common method to disable any process is by ending it through the Task Manager. All of the processes and services which are currently running in your system are found in the Task Manager.
To disable the Sedlauncher.exe file successfully, follow the below steps sequentially:
Step 1: Open the run dialog box in your system by either pressing Windows key + R or from the start menu. Click on the Windows icon found at the bottom left corner of the taskbar and type run in the search bar. Now open the run dialog box.
Step 2: Start the Task Manager by typing the text ‘taskmgr’ in the Run dialog box and press OK.
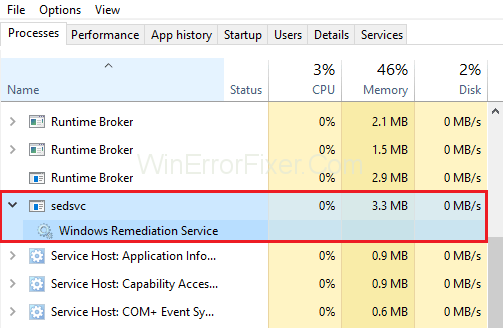
Step 3: As soon as Windows Task Manager unfolds, below the menu bar you will find a list of options. Select the Processes tab and search for Windows Remediation service.
Step 4: Now right-click on it and choose the End Task option.
Step 5: Finally, exit the Task Manager and restart the system to apply changes.
Since you have disabled the Windows Remediation Service, program files like sedlauncher.exe and few others will not function. However, there is a recognizable improvement regarding systems performance.
Solution 2: Disabling Sedlauncher.Exe from Services
If you aren’t comfortable with the above method, you can use this method to disable the service from services utility. Locate the Windows Remediation Service by using the Windows service management tool and change the properties of the service.
Step 1: Open the run dialog box in your system by either pressing Windows key + R or from the start menu. Click on the Windows icon found at the bottom left corner of the taskbar and type run in the search bar. Now open the run dialog box.
Step 2: Start the Services by typing the text services.msc in the Run dialog box and press OK.
Step 3: In case you are prompted with the run as administrator option. Press yes, and continue further.
Step 4: Now, an enormous list of options is available for you. Scroll down and search for the service “Windows Remediation service”.
Step 5: Now right-click on this service and choose Properties from the drop-down list.
Step 6: Choose the General tab from the menu listed at the top of the Properties window and scroll down to find a drop-down menu next to Startup Type. From this Menu select disabled and click OK.
Step 7: Exit the services window and restart the computer to apply the changes. Hopefully, this should fix the Sedlauncher.exe issue.
How to Fix Sedlauncher.Exe High CPU Usage
As we have explained above that Sedlauncher.exe is a part of the KB4023057 Windows 10 update patch which was initially developed to maximize the speed of the Windows service on your system.
Even though this update was launched with speed optimization in mind and to safeguard the system, an enormous number of users have complained that after this particular update their entire system is de-escalated significantly.
Even trivial tasks like copying a file or playing a video take too much time to process. Users have also reported that they find the Sedlauncher.exe process whenever they try to access the Windows Task Manager.
There are some alterations regarding the file we are discussing in this article. We can find this process by the name sedsvc.exe, redmpl.exe, etc. However, they all are a part of the Windows Remediation Service.
In case your system speed has been reduced consistently, follow this article to dig into the productive methods to solve this issue and resume using your computer as usual.
Solution 1: Stop And Disable “Windows Remediation Service” Process
Step 1: Firstly, open the Run dialog box by holding the Windows key + R. Now type the text ‘services.msc’ in the Run text box and click OK.
Step 2: In case you are prompted with the “Run as Administrator” command privileges, choose yes. Next, we have listed many options for you in the services window. Scroll down and locate the one that says “Windows Remediation Service” (sedsvc).
Step 3: Again, double click on this option to access the properties window.
Step 4: Now, in the Menu choose the General tab; narrow down and choose Disabled from the drop-down menu found next to Startup type.
Step 5: Finally, click OK and see if the issue exists.
Solution 2: Completely Remove Windows Setup Remediations
If the above mentioned methods haven’t solved your error successfully. Follow the methods further below to get rid of the error “sedlauncher.exe high disk usage”.
Step 1: Firstly, open the Windows settings by pressing the Windows key + I key.
Step 2: Secondly, from the settings, choose Apps.
Step 3: Within the Apps and features list, scroll and locate the program ‘Windows Setup Remediations (x64) (KB4023057)’ or ‘update for Windows 10 for x64 based Systems (KB423057)’.
Step 4: Lastly, uninstall it by clicking on the program and choosing the option ‘Uninstall’.
This should probably fix the issue concerning the high CPU and Disk usage problem in Windows 10.
Solution 3: Disable REMPL Task
Step 1: Firstly, open the run dialog box by holding Windows key + R. Now type the text ‘taskschd.msc’ in the Run dialog box and press Enter.
Step 2: Now, inside the task scheduler window, click on the small arrow (>), which will appear at the left of ‘Task Scheduler Library’ and expand the drop-down menu.
Step 3: Further, follow and select the path ‘Microsoft > Windows > rempl’ folder.
Step 4: After selecting the rempl folder, you will find a ‘shell’ task in the center panel of the Task Scheduler window.
Step 5: Lastly, select the shell task and choose the Delete Folder key. If prompted, select yes.
Solution 4: Block Windows Remediation Service Using Firewall
This method is an effective solution to this issue. This method is helpful for those who are troubled with this error. Even though they do not have any 3rd party antivirus applications installed in their system. Follow the steps thoroughly:
Step 1: Firstly, go to the Start menu by pressing the Windows icon found at the bottom left corner of the screen. Also, you can press the “Windows key” on your keyboard. Now type “Windows Defender Firewall” in the search box and select it.
Step 2: Secondly, click on Advanced Settings found on the left side menu. Just in case if you are prompted with the “Run as administrator” privileges, choose yes.
Step 3: Again, from the menu found on the left side, select “Outbound Rules”.
Step 4: Next, choose the ‘New Rule’ option found on the upper right corner of the Windows Firewall window.
Step 5: A pop-up window is visible for you where four rules are listed: choose “program”. Then click on the Next button.
Step 6: Next, under the program path, click on the browse button to navigate to the location of the Windows Remediation Service on your drive. The location where it is usually found is C: > Program Files > rempl.
Step 7: Select the file named ‘sedvsc.exe’ and click the next thrice to complete the process.
Step 8: Lastly, give a name for your new rule and click Finish.
What Are Clean System Files?
Clean system files refer to the files on your computer that are essential for the smooth running of your operating system. These include system configurations, program executable files, and system libraries.
Keeping these files “clean” means ensuring they are free from malware, corruption, or unnecessary duplications. This can speed up your computer and reduce errors.
How to Clean System Files
- Disk Cleanup: Windows offers a built-in Disk Cleanup utility that can scan and remove unnecessary system files.
- Third-Party Cleaners: Software like CCleaner can also help in cleaning system files.
- Manual Deletion: Advanced users may choose to manually navigate to system directories to remove unwanted files, although this carries some risk.
How Do I Disable Windows License Service?
Windows License Service is a feature that ensures the copy of Windows running on your machine is genuine. However, there may be scenarios where you need to disable it, perhaps for troubleshooting.
Here’s how:
Method 1: Services Application
- Type
services.mscin the Start menu and press Enter. - Scroll down to find the “Software Protection” service.
- Right-click and choose “Properties.”
- Change the “Startup type” to “Disabled” and click OK.
Method 2: Command Prompt
- Open Command Prompt as an administrator.
- Type
sc stop sppsvcto stop the service. - Type
sc config sppsvc start=disabledto disable it at startup.
Caution: Disabling the Windows License Service may violate Microsoft’s terms of service and should only be done for genuine troubleshooting purposes.
Conclusion
The Fusion of these methods will definitely yield you a productive solution for the fix Sedlauncher.exe high disk usage issues on Windows 10. Hope you have followed the article thoroughly to resolve the issue and resume your computer functions normally.
Understanding the intricacies of Sedlauncher.exe errors, the importance of clean system files, and how to disable the Windows License Service can help you manage your Windows operating system more effectively.
Whether it’s high CPU usage due to Sedlauncher.exe or the need to clean your system files, proper knowledge and the right techniques can ensure a smoother computing experience. Always remember to take necessary precautions, like backing up important data, before performing significant system changes.


