Nvidia comes with many background processes, and one of them is Nvidia container high CPU usage. Sometimes these background applications show some abnormal behavior, which may cause to slow down your computer and disturb other processes too, and one such application is Nvidia container.
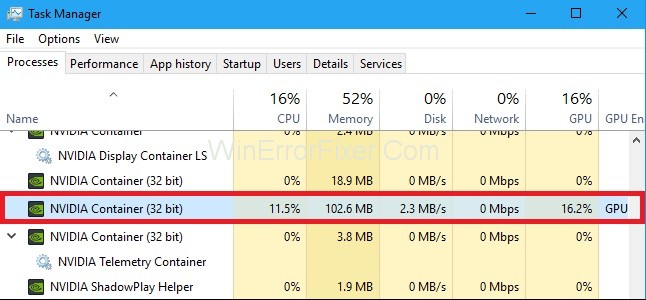
If you are a user of NVIDIA’s graphics cards, you’ve probably come across the term “NVIDIA Container” at some point, especially if you’ve ever browsed through your Task Manager.
What is it, and is it crucial for your system? In this comprehensive guide, we will delve into what NVIDIA Container is, its functionality, CPU usage, and how you can manage this process on your system.
What is NVIDIA Container?
The NVIDIA Container, or nvidia-container, is a set of software components that NVIDIA uses to start and manage containerized GPU applications. A container is like a lightweight standalone executable package that houses everything necessary to run a program, including system tools, libraries, and settings.
NVIDIA Container allows these GPU-enabled containers to run consistently across different computing environments, simplifying deployment and management.
What is NVIDIA Container Used For?
NVIDIA Container is designed to facilitate various functionalities related to NVIDIA services on your system:
- Driver Services: It enables the smooth operation of NVIDIA drivers, ensuring they interact correctly with the OS and other software.
- Application Settings: Manages settings for games and other software that use NVIDIA GPUs.
- Updates: Checks for and installs new updates for the NVIDIA drivers.
- GPU Deployment: Makes deploying applications that require GPU resources easier and more streamlined.
What Causes the Nvidia Container High CPU Usage?
There are several causes which might disturb the Nvidia container and it causes many people headache. Check Out the list below.
1. Geforce experience may be the one the reason for disturbing the activities of the Nvidia container.
2. The telemetry container of Nvidia might be corrupted and initially causing the problem in the container high CPU usage.
3. Some third-party application, which may be download from a known source, comes bundled with some viruses and causing some irregularities with system drivers, which in turn may be affecting the Nvidia container high CPU usage.
3 Ways to Fix NVIDIA Container High CPU Usage
Solution 1: Install Older Nvidia Drivers
Most of the people update the Nvidia drivers to their latest version. After that, they start facing the NVIDIA Container High CPU Usage problem because, after the update, drivers take more than necessary resources.
So the best and easy way to solve the NVIDIA Container High CPU Usage issue is to install the last working update one your machine, which is not causing you any problem. Follow the steps which are written below to do so.
Step 1: Open the Device Manager by typing it in the Windows search bar and open the best match result, or you can press Windows + R and type devmgmt.msc to open device manager.
Step 2: Next, expand the display adapters and Right Click on the graphic card and choose to uninstall.
Step 3: If any pop-up appears on the screen, allow it and wait till the process is done.
Step 4: Next, Open the Nvidia official website and choose the graphics card you have on your system and choose an older version of the drivers, which is working fine on your System.
Step 5: Follow all the procedures of installation step-by-step by reading the instructions appearing on the screen, and after the installation process is done, check for the problem is resolved or not.
Related Posts:
- NVIDIA Control Panel Missing
- NVIDIA GeForce Experience Not Working
- NVIDIA Installer Cannot Continue
- NVIDIA Installer Failed
- NVIDIA Display Settings are Not Available
Solution 2: Disable Nvidia Schedules Tasks and the Nvidia Telemetry Container Service
Nvidia Schedule tasks and the Nvidia telemetry container service might be causing you trouble because sometimes they get corrupted after the update or because of some programs which affect the Nvidia container high CPU usage.
However, many users have reported that disabling the schedules tasks and telemetry container services might be helpful to solve the problem, so let us check it out.
Step 1: Open the control panel by typing it in the search bar, after that navigate for the administrative tool entry and locate for the Task Scheduler in the next screen.
Step 2: Next, click on the task scheduler library and search for all tasks begin with ‘NvTm’, right-click on them, and choose Disable from the context menu which will appear. Repeat the same process for each entry.
Step 3: After that, close, the task manager and open Run by pressing Windows+Rand type services.msc in it and press Enter.
Step 4: Now, locate for the Nvidia telemetry container service and right-click on it and select properties.
Step 5: In the properties menu, you will see on option naming services status stop it in case it is started.
Step 6: Next, Disable the start-up type, and after that, click on Apply to apply the changes, and after that, press OK and if any pop-up appears after that, confirm it.
You may receive the following error message when you click on Start:
“Windows could not start the service on Local Computer. Error 1079: The account specified for this service differs from the account specified for other services running in the same process.”
If this happens to follow the below steps to fix it.
Step 1: Press Windows + R to open RUN, then type services.msc and press Enter.
Step 2: Then, navigate for the Nvidia telemetry and right-click on it.
Step 3: Now, A new tab will open find Log On option in it and then click on it.
Step 4: In Log on the tab, you will see an option this account chooses it then click on the browse button.
Step 5: Then, enter the object name in the dialog box appearing on the screen, then click on check names and wait for the process to b completed.
Step 6: Finally, click on the OK button and afterward type the password in the password box and then click on apply changes, now it will start without causing any issues.
Solution 3: Uninstall Geforce Experience
Geforce Experience is the software that is created by the Nvidia, which allows you to do many things you can also launch the game from the Geforce experience with the best setting you want in your game. You can install the update from here; you don’t need to visit the website for installing the update.
But sometimes the despite for the so many uses of the Geforce experience it can also be the leading cause for the high CPU usage, many users reported that uninstalling the Geforce experience might solve the NVIDIA Container High CPU Usage Error. So, follow the steps to do so.
Step 1: Open the control panel by typing it in the search bar and choose the best match result. After that, click on uninstall programs and search for the Geforce experience.
Step 2: After that, click on the uninstall button and allow the pop-up if appear on the screen and follow the steps which may be appearing on the screen, and once the uninstalling is completed, restart your computer afterward.
Check for the problem is resolved or not if not try the other solution which are given down below.
Why is NVIDIA Container Always Running?
The NVIDIA Container is designed to be a background process that keeps running to manage various NVIDIA services. It ensures that your GPU works flawlessly with the operating system and installed software. If you’re using any NVIDIA services actively or passively, the container will keep running to maintain them.
Why is NVIDIA Container Using So Much CPU?
In general, NVIDIA Container should not be using significant CPU resources. However, you might occasionally observe spikes in CPU usage due to:
- Updates: When the NVIDIA Container is updating drivers or software.
- Running Applications: If you are running graphics-intensive programs or games, the container may use more CPU to manage these tasks.
- Errors: Sometimes, bugs or conflicts with other software can cause increased CPU usage.
Can I End NVIDIA Container Process?
Technically, you can end the NVIDIA Container process via the Task Manager, but it is generally not recommended.
Doing so will interrupt any NVIDIA services currently running, which could result in undesirable behavior, including crashes or glitches in graphics applications or games you may be running.
Is It OK to Disable NVIDIA Container?
Disabling the NVIDIA Container could lead to performance issues, failure of NVIDIA services to start correctly, and even system instability.
Therefore, it is generally not advisable to disable it unless you’re sure about what you’re doing and are prepared to manage potential repercussions.
How Does NVIDIA Container Runtime Work?
NVIDIA Container Runtime is a modified version of the standard container runtimes like runc, but it’s customized to understand and make use of NVIDIA’s proprietary GPU drivers. It provides a runtime environment that allows the container to access the GPU hardware directly.
This is particularly useful for developers working on machine learning, data science, or graphic-intensive applications that require GPU resources.
How Do I Exit NVIDIA Container?
Exiting or stopping NVIDIA Container can be done via Task Manager, but as mentioned before, this is not recommended for the average user. If you must proceed, you can locate the process in the Task Manager under the ‘Processes’ tab, right-click on it, and choose the ‘End Task’ option. Keep in mind that this might lead to instability or performance issues.
Similar Posts:
- Windows Audio Device Graph Isolation High CPU
- NVIDIA Container High CPU Usage
- Compattelrunner.exe High CPU and Disk Usage
- WMI Provider Host (WmiPrvSE.exe) High CPU Usage
- Microsoft Compatibility Telemetry High Disk Usage
- NVIDIA Display Settings are Not Available
Conclusion
Hope all the above methods helped you to get the desired result, follow all the steps written above carefully because you need to follow all the steps one after the other without missing any step, please perform the above operation with a calm mind without making any rush and if you do so it will definitely go to work for you.


