Error: Core dump could not be written in Minecraft. What gives? It has been reported that an integrated Intel graphics card is a common cause of this problem. A botched AMD installation, incorrect graphics card settings, and a missing dump file are also to blame for Minecraft not writing a core dump on Windows 10.
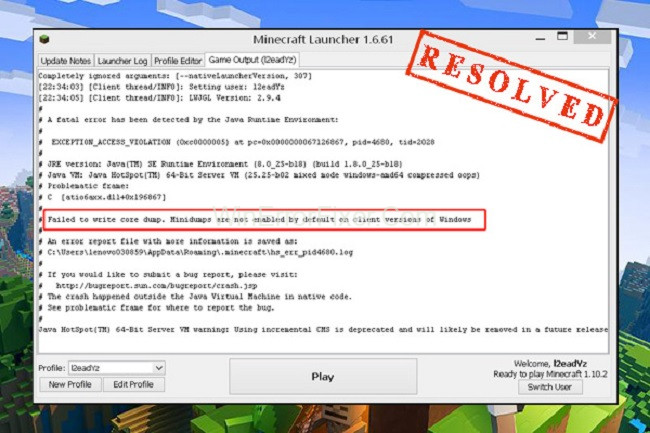
If you’ve been working with software on a Windows operating system, you may have come across an error message that says “Failed to write core dump. MiniDumps are not enabled by default on client versions of Windows.”
This article aims to provide an in-depth explanation of what this error means, what causes it, and the default location where a core dump would typically be written.
What is a Core Dump?
First, let’s understand what a core dump is. A core dump is essentially a snapshot of a program’s memory at a specific moment in time. It is often used for debugging purposes, especially to find out what caused a program to terminate unexpectedly. Core dumps can be invaluable for software developers who are trying to diagnose the root cause of an issue.
The Error: “Failed to Write Core Dump”
When you see the message “Failed to write core dump,” it usually means the program you were running encountered an exception or error that it could not handle, and it attempted to write a core dump file for debugging. However, due to certain restrictions or settings, this operation failed.
MiniDumps Are Not Enabled by Default on Client Versions of Windows
The term ‘MiniDump’ is specific to the Windows environment. MiniDumps are smaller subsets of full core dumps that contain less data but are often sufficient for debugging purposes. In Windows, especially on client versions like Windows 10, MiniDumps are not enabled by default for performance and privacy reasons.
Causes of the Error
Understanding the root cause behind this error message can be vital for diagnosis and subsequent problem resolution. Here are some common reasons:
1. Insufficient User Privileges
Sometimes, the user running the application doesn’t have the necessary permissions to write to the file system, causing the core dump operation to fail.
2. Storage Space
A core dump can consume a significant amount of disk space. If your system is running low on disk space, writing a core dump will fail.
3. Operating System Restrictions
As mentioned, client versions of Windows have MiniDumps disabled by default. If you haven’t manually enabled this feature, it can lead to this error.
4. Software or Hardware Issues
Sometimes, the program encountering the error might itself be the problem. Memory corruption or hardware issues can lead to unexpected behavior, including failure to write core dumps.
Fix 1: Make Sure You have the Most Recent Version of the Intel Graphics Card Driver Installed
Failed to write core dump. if you are using an integrated Intel graphics card A Dynamic Link Library file causes the “Mindumps are not enabled by default on client versions of Windows” issue. You might try updating the Intel graphics card driver to see if it helps.
- To open Device Manager, type devmgmt.msc in the Run dialogue box and hit Enter, then press the Win + R key.
- Right-click the Intel graphics card driver and select Update driver from the context menu.
- When prompted, click on the option to automatically check for newer versions of the driver’s software, and then follow the on-screen instructions.
The “Failed to write core dump Minecraft” error can be checked whether the computer has been restarted.
Read Also:
- There Are Some Data After The End Of The Payload Data
- This Application Has Encountered An Unspecified Error SWTOR
- It Looks Like You Don’t Have Permission To Save Changes To This File
Fix 2: VSync and Triple Buffering Should be Enabled in the NVidia Control Panel.
On NVidia GPUs ranging from mid-range to high-end, some players report being unable to update the Minecraft runtime environment. Incorrect graphics card settings could be at blame. VSync and Triple Buffering settings can be enabled in order to fix the problem.
- From the context menu of a right-click on your desktop, select the NVidia Control Panel. The control panel can also be found in the Taskbar.
- Go to the Program Settings tab by selecting Manage 3D settings in the left pane.
- Using the Add > Browse buttons, choose the javaw.exe file from your Java installation directory and then click on Open. This is the third step.
- Then, choose the Vertical Sync and Triple Buffering options from the list of Features, and then change their default value to On from the Settings pane when Java has been loaded into your browser.
- For the final step, click the Apply button. After that, every software that makes use of Javaw.exe, including Minecraft, will have access to these two features.
You can now join a server again and check if the “Failed to write core dump” error still appears. Client versions of Windows do not come pre-configured with minidumps enabled by default.
Fix 3: Make Windows Create a Dump File by Default
There may be a problem with the dump file, as previously noted, leading to the “Failed to write core dump Minecraft” error message being displayed. You may force Windows to create a dump file in this situation. Here’s how to go about it:
- To begin, open the Minecraft Launcher on your PC.
- Open Task Manager by pressing Ctrl + Shift + Esc. To access the Task Manager, right-click the Taskbar at the bottom of your computer screen and pick Task Manager from the context menu.
- Create a dump file by selecting Create Dump File from the context menu of the Java(TM) Platform SE Binary process. The Minecraft Launcher category should be expanded if you can’t locate it.
A Dump file will be created by Windows after the issue is resolved. After that, reboot your computer and see whether the “Failed to write core dump..” message reappears. Client versions of Windows are no longer unable to use minidumps by default.
Fix 4: Reinstall the AMD Catalyst Utility or the AMD Catalyst Software.
Minecraft failed to write core dump on Windows 10 for some AMD GPU users. This can be caused by an AMD software installation that is partially corrupted. Reinstalling the ADM or AMD Catalyst software may help with this.
- Open the Run dialogue box by pressing Win + R, then type appwiz.cpl and press Enter.
- Uninstall the AMD software/AMD Catalyst by right-clicking it and selecting Uninstall in the Programs and Features window.
- Wait for the uninstallation to finish and then click on OK.
- Reinstall the AMD software by downloading it again from the official AMD website and following the on-screen prompts.
If the “Failed to write core dump..” message persists, you can restart your PC and join a server. There is no longer an error stating that “Mind dumps are not enabled by default on client versions of Windows.”
Where is the Default Location for Core Dumps?
The default location where core dumps are written can vary based on the system configuration and the program that’s crashing. However, in Windows, when enabled, MiniDumps are often saved in the following directory:
C:\Windows\Minidump
You may also specify a custom path for dump files via system settings or environment variables.
How to Enable MiniDumps on Windows?
If you wish to enable MiniDumps for debugging purposes, you can do so by:
- Right-clicking on ‘This PC’ and selecting ‘Properties.’
- Going to ‘Advanced system settings.’
- Under ‘Startup and Recovery,’ click ‘Settings.’
- In the ‘System failure’ section, check ‘Write an event to the system log’ and select ‘Small memory dump’ in the ‘Write debugging information’ dropdown menu.
Read Also:
- An Attempt Was Made To Reference A Token That Does Not Exist
- Anyconnect Was Not Able To Establish A Connection To The Specified Secure Gateway
- Raw-Mode Is Unavailable Courtesy Of Hyper-V. (Verr_Supdrv_No_ Raw_Mode_Hyper_V_Root).
Conclusion
The error “Failed to write core dump. MiniDumps are not enabled by default on client versions of Windows” can occur for a variety of reasons ranging from user permissions to system restrictions. Understanding these factors can help in effectively diagnosing and resolving issues.
Moreover, knowing how and where to enable MiniDumps can be invaluable for software debugging. Keep an eye on your system resources and permissions to ensure smooth operation and effective debugging when needed.


