The Err_Cert_Authority_Invalid is generally a windows error that is displayed in the form of a message when an individual visit or operates through connections that are not secure.
One of the easiest ways to counter this type of problem without any technical knowledge understanding is to switch to other browsers which are quite secure in terms of data management which will fix the connection not the private error message
Following our methods will help you to get rid of the problem net::Err_Cert_Authority_Invalid and will also help to disable certain extensions in chrome which can be a reason for such errors and hence avoiding such types of errors in the future.
One of the things which can be done to provide a quick fix to this problem is to adjust the settings in your antivirus which is shown below. Keeping the windows security feature on and providing it updates on a regular basis can be of great use in making your daily tasks completely safe.
That’s why we always recommend using antivirus as it has Firewall Technology which helps to protect and enable the web browser to search in a Private manner And also update the browsers to the latest build which will help them keep the data safe and secure
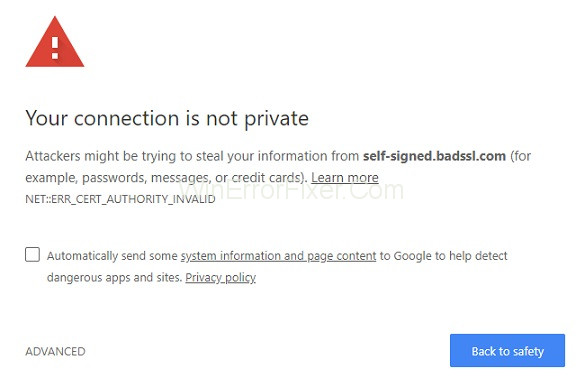
The most common error which we face is “Err_Cert_Authority_Invalid” And it is because the browser or the connection established that you are using is not private and can lead to hackers interfering with the process.
But it naturally does not mean that everything you navigate it is through a risky website as that might be a general issue which is commonly observed in the Windows 10 system or the websites can be lagging their SSL CERTIFICATES or the Certificate might not be updated on the server website on the web browser which you are working on.
Web browsing has become an integral part of our daily lives. Chrome, being one of the leading browsers, often introduces us to a myriad of error messages. One such vexing error is the Err_Cert_Authority_Invalid.
This error can interrupt our seamless browsing experience, but understanding its causes and potential solutions can save the day.
What is Err_Cert_Authority_Invalid?
The Err_Cert_Authority_Invalid is an SSL error that pops up when the browser detects an issue with a website’s SSL certificate. The Secure Socket Layer (SSL) certificate is a digital certificate that provides authentication for a website and establishes an encrypted connection.
When Chrome finds the certificate untrustworthy or invalid, it flags this error to protect users from potential security threats.
Causes of Err_Cert_Authority_Invalid Error:
- Expired SSL Certificate: Certificates have a validity period. If a website’s certificate has expired and hasn’t been renewed, browsers will identify it as untrustworthy.
- Unrecognized Certificate Authority (CA): If the certificate is issued by an unrecognized or untrusted CA, Chrome will flag it as a potential risk.
- Incorrect System Date & Time: A mismatch between the system’s current date & time and the website’s SSL certificate can trigger this error.
- Interference by Third-party Software: Sometimes, antivirus programs or firewall settings can interfere with the SSL handshake between the browser and the web server.
- Corrupt or Outdated Browser: Outdated browser versions or corrupted installations might not recognize newer SSL certificates, causing the error.
How To Fix Err_Cert_Authority_Invalid Error In Chrome
Sometimes this error can be caused due to a malfunction that you receive on a website or on a page that is secured too. Since in every case the problem is prompted while using Google chrome.
For this reason, you can use some troubleshooting steps for a particular web browser or for a website in which you face this problem. These are some of the important steps which one can use to fix the Err_Cert_Authority_Invalid Problem.
1. Check The Date And Time Settings
As we know that for security reasons, Chrome and all the major other web browser clients will only allow you to access web pages if and only if the provided date and time settings of your device are set correctly. And for that, we opt to see that whether the date or the time settings are correct as well as there are no changes in the settings tab.
And if for some consequence you have to cancel some of the time or date settings on your Windows 10 computer, you will get an error named Err_Cert_Authority_Invalid each and every time you tend to try to access any of the pages on the internet and it will also prompt you to change your browser or use another link which is secured instead.
This means that the browser’s date and time settings that you use will be in sync directly with your PC and must match (can be of different time zones which do not affect the process).
Therefore, you should initiate the troubleshooting initiative by setting the correct date and time on your device as per the current standard time for your location which is easy to do as you follow the article.
2. By Adjusting The Antivirus Settings
Bit Defender option in the settings:
Step 1: By clicking on the Settings option and then clicking on the Privacy Control option in the settings. Now switching to the Anti Phishing tab. From there we can set Scan SLL to Off.
Step 2: Relying on the Bit Defender version which we use as we would do the following steps instead of by going to the Protection option and then choosing the Web Protection and putting off the Scan SSL option from the settings.
By AVAST
Step 1: Now Launch the Settings option and then choose the Active Protection option.
Step 2: Then by clicking the Web Shield option and then choosing the Customize option in the settings. Now uncheck the Unable HTTPS Scan option into the settings if not done already.
BY Kaspersky:
Step 1: Navigating to the Settings. And then Clicking on Extend and then selecting Network Settings.
Step 2: From that screen, you will have various options which will be similar to the SSL scan option in the settings. Now Choosing the one that lets you navigate through all the browsers and websites.
3. Disable The Different Extensions On Chrome
Step 1: Open Google chrome from the website operating browser and click on the Menu icon. Now Clicking onto the More tools settings and then select the above extensions given in the pop-up menu.
Step 2: Now putting off all the installed Extensions on the device and then we can reboot the Chrome tab or application for the changes to be applied. Now going to the Settings option again and now scrolling down, and then picking the Show Advanced Settings option
Step 3: Now Under the Privacy and Security option, now you need to click on the Cookie option and then click on the other site credentials and data from the right pane into the website.
Step 4: Now the next step is to unmark the Send a Do Not Track request with your browsing traffic option and then select it. Now restart the Google Chrome browser after applying all the changes in the settings as said above.
And If by any chance if the Chrome gets stuck, you can always make use of the chrome guide for applying a fix to it and resolving the issue.
4. Clearing The History On Chrome
Step 1: Accessing the Chrome’s Settings. Now Scrolling down and then pick the Advanced Settings. Now clicking on the Clear data of the browsing option on your computer in the chrome tab settings.
Step 2: And now from the pop-up which appears from where you can select the fields from the list and when you have selected the required ticks now click on the Clear browsing data option. This will clear all the browsing data.
5. Assigning The DNS Settings
Step 1: By selecting the pop-up generated and then using the Search toolbox option from where we can enter the Network and Sharing Center menu.
Step 2: Now clicking on the left side menu then choose the Change Adapter Settings by clicking. Now Right-clicking on the Adapter option that’s currently active and then select the Properties option. Picking Internet Protocol Version 4 and then selecting Properties.
Step 3: Clicking on the following approved DNS server address available and then type the Google’s Public DNS servers out of which some are: 8.8.8.8, respectively 8.8.4.4 by selecting them.
Applying these settings and then restarting your Windows 10 machine will fix it.
How to Accept Invalid Certificates in Chrome:
If you understand the risks and still wish to proceed, you can bypass the Err_Cert_Authority_Invalid warning:
- Visit the Site Anyway: On the warning page, click on “Advanced” and select “Proceed to [website]”.
- Manual Certificate Installation: Obtain the website’s SSL certificate (usually provided by the site admin) and manually install it into Chrome’s trusted root certification store.
How to Ignore Certificate Errors in Chrome:
For users who want to bypass such warnings regularly (not recommended for daily browsing), you can:
- Use Chrome’s Flags:
- Launch Chrome.
- Enter
chrome://flags/#allow-insecure-localhostin the address bar. - Enable the “Allow invalid certificates for resources loaded from localhost” option.
- Launch Chrome with Ignore Certificate Errors Flag:
- Close all running Chrome instances.
- Right-click on the Chrome shortcut > Properties.
- In the Target box, append
--ignore-certificate-errors. It should look like:"[Path to Chrome]\chrome.exe" --ignore-certificate-errors. - Click OK and launch Chrome using this shortcut.
Note: Ignoring certificate errors can expose you to risks, such as man-in-the-middle attacks. This approach is not advisable for regular browsing or accessing sensitive websites.
Conclusion
These are all the methods that will provide you a quick and sure solution to the Err_Cert_Authority_Invalid error problem in your chrome and solve the error displayed by your respective web browser.
While Err_Cert_Authority_Invalid aims to protect users from potentially harmful websites, understanding its causes helps users make informed decisions. While there are ways to bypass this error, always prioritize security over convenience.
If a trusted site presents this error, it’s recommended to contact the website administrator, as their certificate might need renewal or proper configuration.


