The Android operating system is one of the most popular OS in the world. It contains many advanced and useful features that users love on their phones. Besides these features, Android comes up with some issues as well.
Android.Process.Media Has Stopped is one of the most common issues that Android users face.
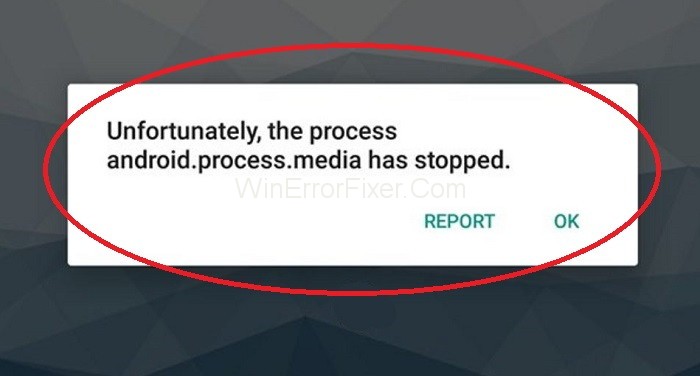
Android.Process.Media Has Stopped Error affects the functionality of your device. It becomes really important to remove Android.Process.Media Has Stopped error as soon as possible. If you’re an Android user, you may have come across the term Android.Process.Media and wondered what it is.
Additionally, you might be interested in optimizing your device by cleaning media storage, clearing the cache, or managing media output settings. This detailed guide delves into each of these topics, offering you comprehensive insights and solutions.
What is Android.Process.Media?
Android.Process.Media is a background service that runs on Android devices. It essentially acts as an intermediary between your device’s media storage and various applications that access media files like photos, music, and videos.
This service helps in the indexing of media files, making them easily accessible to apps and ensuring smooth media operations on your Android device.
Reasons Behind Android.Process.Media Has Stopped Error
There are different causes of this error. Download Manager and Media Storage applications are the main sources of this error. Moving from one custom RAM to another can also cause this issue. Virus attacks, failed firmware update, restoring apps via Titanium backup are also some of the reasons.
How to Fix “Android.Process.Media Has Stopped” Error
After knowing the reasons, proceed towards a solution. Always take a full backup of your Android device before fixing this error. There are several methods to remove Android.Process.Media Has Stopped error. Some of the most effective solutions are:
Solution 1: Reset App Preferences
Resetting app preferences is another way to resolve Android.Process.Media Has Stopped error. Apply the following procedure:
Step 1: First of all, open Settings on your phone.
Step 2: Browse for Application Manager or Apps. Even there are other different options as well, according to the Android model.
Step 3: Select the three-dot menu icon that is usually present on the top right corner. Select Reset App Preferences to bring back all the applications to its original state.
Hopefully, you will be able to solve the Android.Process.Media Has Stopped issue with the help of this method.
Solution 2: Clear Google Service Framework Cache & Data
Clearing cache and data of different applications is the basic solution for many errors. In case of this error, clear cache and data for Google Services Framework. Apply the given steps to do so:
Step 1: Simply go to the Settings → Applications → Manage Applications. Here you can see Google Services Framework. Press Clear Cache and Clear Data selectively.
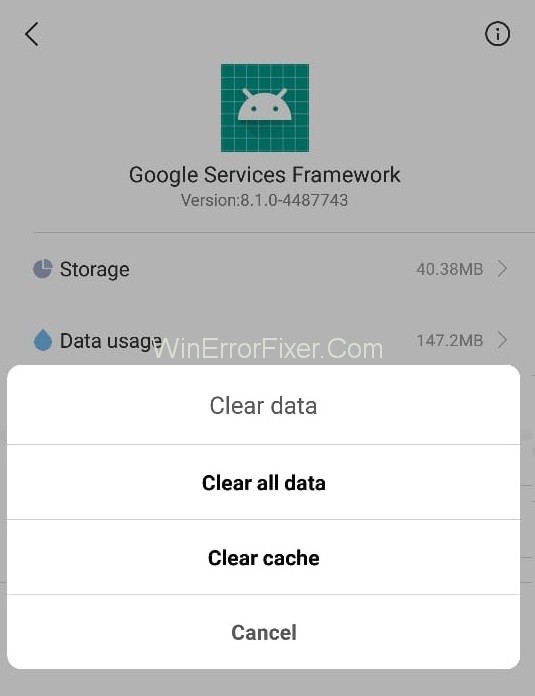
Step 2: Once you are done with this, scroll down, and find Google Play. Tap on it and clear its cache and data.
Step 3: Again, go back to the Google Service Framework option. Click on Force Stop → Clear cache → OK.
Step 4: Next, you need to open Google Play, and when presented with an error, click OK.
Step 5: Turn off your device and then turn it on again.
Now go to Google Services Framework again and turn it on. Now see if the Android.Process.Media Has Stopped issue still exists.
Solution 3: Clear Contacts and Contact Storage
This method may result in losing your contacts. So, back up your contacts before applying this solution. Following are the steps for performing this operation:
Step 1: Go to Settings on your Android phone.
Step 2: Move to the Apps Setting section.
Step 3: Now, tap on Installed apps.
Step 4: Click on the three-dot menu icon present on the top right corner — Select Show all apps option.
Step 5: After that, search for Contacts Storage and tap on it.
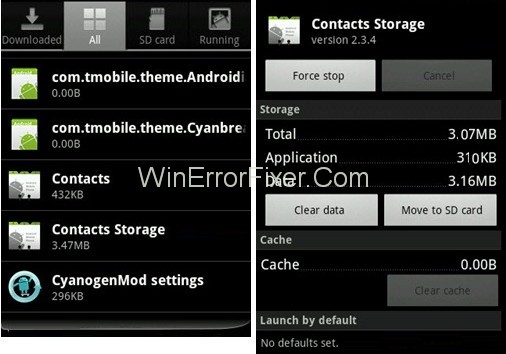
Step 6: Tab on Clear cache and Clear data.
Check if you can solve “android.process.media has stopped” error or not.
Solution 4: Disable the Media Storage
Trying to disable the media storage settings may be helpful for many users. Let us discuss the steps for the same:
Step 1: Open the Settings option of your Android phone.
Step 2: Click on the Application Manager. Search Menu option and then select Show System. It enables you to locate Media Storage from a list of applications.
Step 3: Click on Disable.
Now check if Android.Process.Media Has Stopped problem solves or not. If not, then move to the next solution.
Solution 5: Check Google Sync & Media Storage Settings
Do not forget to take the full backup of pictures before applying this method. Apply the following steps:
Step 1: Go to Settings → Accounts and Personal → Google Sync. Uncheck all the checkboxes. It will stop Google Synchronization.
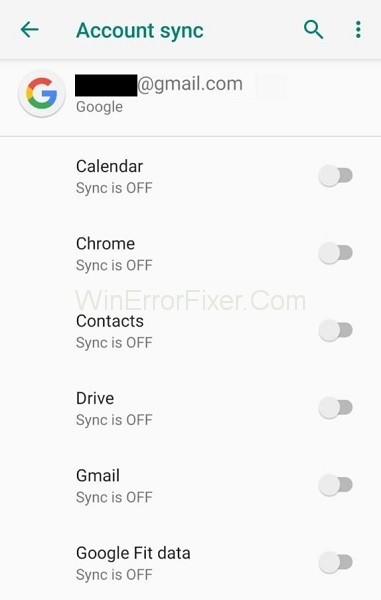
Step 2: Disable and Clear all Media Storage data. For this, go to Settings → Apps → All Apps. Find the Media Storage → Clear Data → Disable.
Step 3: Use the same method as discussed above to clear the Download Manager data.
Step 4: After performing these operations, shut down your device. Turn it on again.
Now check for the Android.Process.Media Has Stopped error message.
How Do I Clean My Media Storage?
Cleaning media storage can help you free up valuable space on your device. Here’s a step-by-step guide:
Manual Cleanup
- Go to the File Manager: Open your device’s file manager.
- Locate Media Files: Navigate to the folders containing images, audio, and videos.
- Select and Delete: Manually select unnecessary files and delete them.
Using Third-party Apps
- Download an App: Get a reputable cleaning app from the Google Play Store.
- Scan for Media Files: Run the app and allow it to scan your media storage.
- Review and Delete: The app will show you redundant or unnecessary media files. Review these and confirm their deletion.
How Do I Clear Media Storage Cache?
Clearing the cache can sometimes resolve issues with media not displaying correctly. Here’s how:
- Go to Settings: Open the Settings app on your Android device.
- Navigate to Apps: Scroll down and tap on ‘Apps’ or ‘Applications.’
- Locate Media Storage: In the list of apps, find ‘Media Storage.’
- Clear Cache: Tap on ‘Media Storage,’ then tap ‘Storage,’ and finally tap ‘Clear Cache.’
Note: Clearing the cache will not delete any media files.
How Do I Turn Off Media Output on Android?
If you’re looking to manage or turn off media output settings, you can do so through the following steps:
- Open Quick Settings: Swipe down from the top of your screen to open Quick Settings.
- Tap Media Output: Find the ‘Media’ or ‘Media Output’ option.
- Select Device: A list of available output devices will appear.
- Turn Off: Choose your device and select ‘Turn Off’ or ‘Disconnect’ to stop media output to that device.
Note: These steps may vary slightly based on the make and model of your Android device.
Also Read:
- How to Take Screenshots on Windows 10
- ERR_EMPTY_RESPONSE or No Data Received
- Error Loading Player: No Playable Source Found
- Error Code 0x80300024
Conclusion
There is no need to worry if Android.Process.Media Has Stopped error occurs in your device. Many solutions are available for resolving Android.Process.Media Has Stopped issue. Most of the time, these methods work well. Apply them step by step to get the best results.
Understanding the role of Android.Process.Media can help you manage your device’s media operations more effectively.
Cleaning your media storage and clearing the media storage cache can significantly improve your device’s performance. Learning how to manage media output settings can also enhance your overall Android experience.


