You should know some network related terms while installing a router for the first time. A router is one of the most common networking devices. Every router is provided with its default IP address, and it could be 192.168.1.1 or 192.168.0.1, etc.
IP 192.168.1.1 is used by many routers including Netgear, Linksys and TP Link Router. For setting up a router, you need to log in to it, and for that, you will require a username and password.
For quite a while, you don’t need to remember the username or password if you haven’t logged in with 192.168.1.1 IP Address. 192.168.1.1 is an IP address which seems quite common in most of the Netgear, Linksys and TP-Link routers. This article will tell you all which needs to be known about it.
What is 192.168.1.1 IP Address?
Every router has its default username and password, which is used to login to the router. There are some IP addresses which are not accessible through the public internet, 192.168.1.1 is one of them.
It is one of the 65 536 IP addresses which belongs to the 16-bit block of the private IPv4 address spectrum. Many Linksys, Asus, D-Link, Netgear, Huawei and TP-Link routers use 192.168.1.1 default IP address. LANs use private IP addresses and therefore save the IPv4 addresses from exhaustion.

Since there is no need for approval from a regional Internet registry for using private IP addresses, anyone can use it, be it an organization or an individual.
All it needs is setting up the devices connected through the internet using NAT (Network Address Translation) method. Home router manufacturers use private IP addresses as a default gateway including 192.168.1.1.
What Is So Special About IP Address 192.168.1.1?
As you might have learned in school that every computer that makes use of Internet Protocol for communication is provided with an Internet Protocol address commonly known as IP address. An IP address provides a unique identity to all the devices on a network for making a path to access it.
If your router isn’t working after a 30-30-30 reset, then it could be broken. You can get a new one or can repair it. Before getting the key, you might have to connect it to routers or modem with the help of an Ethernet wire.
How to Login to 192.168.1.1 Admin Login – Default Router Login
Step 1: First, connect your router and PC through RJ45 cable.
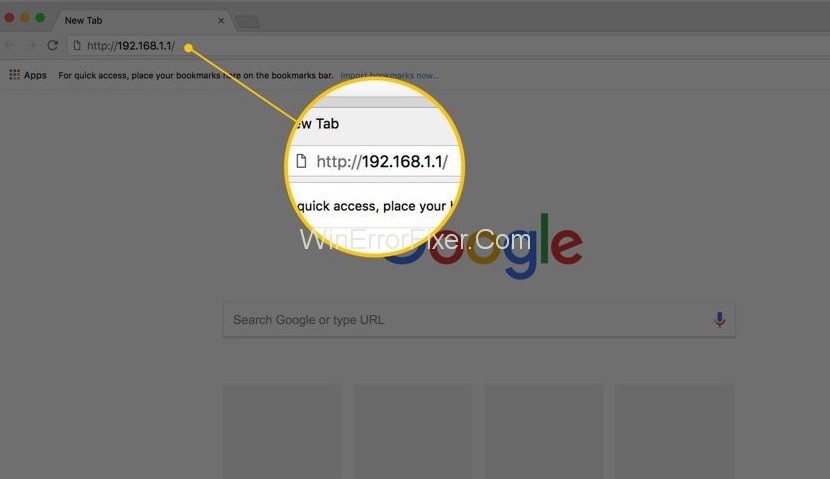
Step 2: Open your browser and enter 192.168.1.1 in the URL bar.
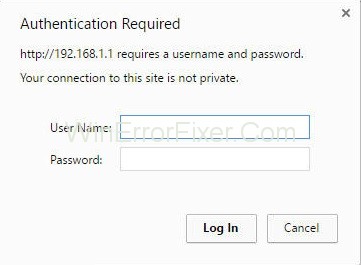
Step 3: A small box will open, which will ask for a username and password. After logging in, go to “Wireless Settings” and then “Change Settings.”
WiFi is an ideal option for using the internet at an affordable speed. You will be linked to the web after a while. If you aren’t connected, then you should talk to your ISP.
192.168.1.1 IP Address Router Reset Settings
Step 1: Switch on the router and connect it to the computer with an Ethernet cable.
Step 2: Type http://192.168.1.1 in the address bar in a web browser.
Step 3: Type the exact username and password in the spaces.
Step 4: Click on the “Administration” tab, then open the “Factory Defaults” sub-tab.
Step 5: From the options given, hit the “Restore Factory Defaults” button.
How to Access NETGEAR Router Admin Page
It is effortless to log into the NETGEAR wireless router admin page. But first of all, you need to make sure that you are connected to the NETGEAR router’s network. If all the things are perfect just dive into the instructions given below:
Step 1: First, you have to sign in for accessing the admin panel. Open the default browser, which you usually use for surfing the internet.
Step 2: Enter “http://www.routerlogin.net“ or “http://www.routerlogin.com“ in the address bar. You can also enter the router’s default IP address 192.168.1.1.
Step 3: In the given window opened, type the username and password in the fields. The default username and password are “Admin” and “Password” respectively (both are case sensitive).
Step 4: Now log in.
Now you are successfully logged into your NETGEAR router configuration panel. You can access the configuration panel for your router whenever you want using your browser for making any changes for your router.
All issues can be solved by it updating the firmware or solving the troubleshooting of your router.
What Are Default Login Credentials for the Netgear Router Login Page?
The first thing for setting up the Netgear router is logging into the routerlogin.net page. It will only require the default username and password for login. You can find it in the router manual booklet easily.
How to Login to a TP Link Router Using 192.168.1.1
If you want to login to your TP-link router and want to get into the router settings, it’s quite simple to do so. There are two easy steps to follow to access your TP-Link router’s admin panel.
Step 1: Open your web browser and enter http://192.168.1.1 in the address bar.
Step 2: A login page will open where you need to type the username and password. The TP-Link routers have a default username and password, which is “admin” in lowercase. Type the login credentials in it.
How to Factory Reset Your TP-Link Router
If you are unable to access the router using the default password, you can factory reset the router.
Step 1: Hold the reset button at the back of the router for 10 seconds while it is powered on. The lights will flash and go off and then again start flashing, which means we have perfectly reset the router.
Step 2: Now again try to login with the default password as the router is back to the default state.
How to Login to Linksys Router Using 192.168.1.1 or 192.168.l.l
Linksys Routers have a default IP address and, therefore, could be efficiently logged in.
Step 1: Open any browser on your PC and enter http://192.168.1.1. And Enter the username and password given below:
- Username: admin
- Password: pass/admin
Step 2: After that, you can access the Router admin page and can change the password form the “Settings.”
192.168.1.1 Router Login FAQ
Q 1. What If My Router IP Address is Not 192.168.1.1, What Should I Do?
Flip the router and see the address written on the label and see if it matches the one you entered. If the hostname is like tplinkwifi.net or tplinklogin.net, then try to go through it.
Q 2. How to Make a Proxy Setting for the Router?
Step 1: Open the “application settings.”
Step 2: Find the “Network” section and hit the “Change proxy server settings” button in it.
Step 3: Go into the properties of the Internet browser Windows 10 and find a “Connections” tab.
Step 4: Click on the “Network Settings” button. Then check “Use a proxy server for local connections.”
Step 5: Remove it and hit the “OK” button. Now try to enter the web interface modem or router.
Q 3. How Can One Verify the Web Browser for the Router Setup?
First of all, you need to check the properties of the Windows Explorer and go back to the Windows Management Console, which is in the “Network and Internet” section. Go to → Internet options → Connections → “Network Settings” button.
Q 4. How to Enter A Router By IP 192.168.1.1?
What router does is, it gets the Internet from one segment of the network (provider) and distributes it to other segments (your home network). That is why the router always has several network interfaces.
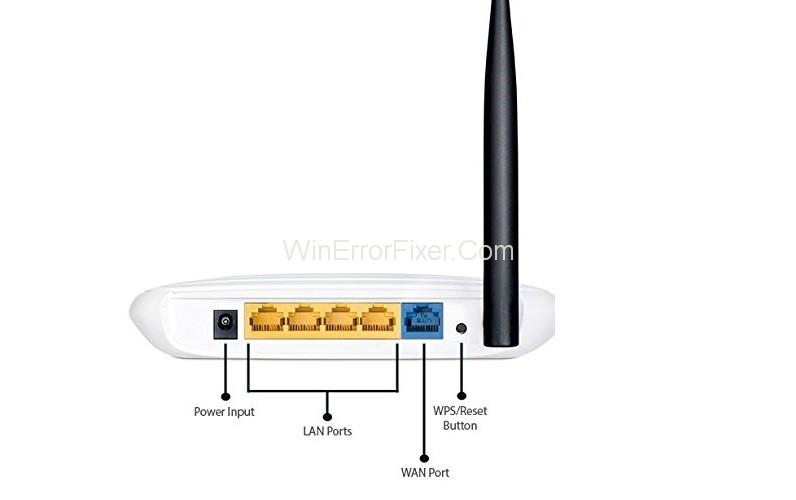
Home type routers of the first type have five ports; one is for connecting to the Internet provider (WAN), the other 4 for connecting computers or devices on LAN. Around 99.9% of the routers are managed through a web interface.
Therefore, you need to enter the router settings through a web browser. You need to use a specific address for that. Most often, it is http://192.168.0.1 or http://192.168.1.1.
Q 5: How Do I Find the IP Pages for Logging Into The Router?
Step 1: To enter the web interface, turn the router on and connect it to a PC through a patch cord. Plug one of its ends to the socket for the network card on your PC and the other one to the router in the LAN jack.
Step 2: See the network connection properties if you don’t know the IP to the router.
Step 3: Type ‘Win + R‘, type ‘cmd’ and hit ‘Enter’. This will open a command line, type ipconfig command, and click ‘Enter.’
Step 4: “Default Gateway parameter” is the next important thing. For this IP address, it is essential to enter the settings of the router.
Step 5: Open a browser and go to the address IP 192.168.1.1.
Q 6: I Was Able to Go to 192.168.1.1, and What’s Next?
Step 1: For configuring your router according to the parameters of the provider, go to the WAN or Internet section.
Step 2: The type of connection to the provider is mostly configured in the WAN section.
Step 3: Don’t touch the LAN section, go to the “WIRELESS” or “Wireless Network” section. We will configure here the parameters of your Wi-Fi network, name, etc.
Q 7: I Cannot Log in to 192.168.1.1, What To Do?
Step 1: Firstly, make sure the computer is connected with the router. Rewind the patch cord and check if the LAN port indicator on the router is lit and the light should be flashing.
Step 2: Check the network settings, could be possible that the DHCP server is not enabled in the router, and the distribution of IP addresses is not done.
Q 8: What can IP Address be Used If We Have No Idea About What Type of IP is Used on your Router – 192.168.1.1, or Another?
If you don’t know the IP used in your router, simply search the router for a sticker where you will find the IP address. Since the D-Link router uses 192.168.0.1 login admin, the password will be “Admin.”
Q 9: The Page Does Not Open for Login 192.168.1.1 What To Do?
Sometimes, we cannot access the router due to defective or crooked cache from a web browser. Try cleaning cookies and cache. If it doesn’t work, try another browser.
Internet Explorer and Microsoft Edge are the best for accessing the settings of network devices. Also, try to log in through secure browser mode.
Q 10: How to Check if the Router is Available on 192.168.1.1?
Step 1: First, you will have to ping the device, for that open the Run dialog box and type “ping 192.168.1.1” in it.
Step 2: Since the router has many LAN ports, try to plug the cable in each of them turn by turn and start the ping.
Step 3: When the router pings without any loss, repeat step 1.
Q 11: How to Fix the Issue of an “Unidentified Network”?
You will have to register the IP address in the network connection settings manually.
Step 1: In the network connection setting, you will find a list. You need to search the “Unidentified network” in it. It means that the IP address was not assigned, and therefore, you were unable to access the router’s personal cabinet.
Step 2: Right-click on this connection and select “Properties” then select the Internet protocol version 4 mouse and again click the “Properties” option.
Step 3: It is essential to register the IP address of the computer according to the settings of the router’s brand. Remember, the IP addresses of computers and router are always different from each other. In 99% of cases, the last digit of the router’s IP address is always 1.
Q 12: What Should I Do If 192.168.1.1 Does Not Open (Not Available)?
If the device is successfully detecting the router, then there could be some problems with the web browser. Repeat the menu entry action after replacing the previous browser by installing the new one.
If this also doesn’t solve the problem, then check for unwanted extensions and viruses in the browser. Another issue could be that the antivirus is blocking the network address. You can disable the firewall for a while or can add a new network in the secure sites.
For disabling the firewall in a standard Windows, follow the steps given below:
Step 1: Open the “Control Panel,” which can be opened through the run command.
Step 2: Then go to “System and Security” and from there “Windows Defender Firewall.”
Step 3: In the left-most part of the Window, you will find the option to disable the firewall. 192.168.1.1 Does Not Open or Not Available is quite rare to happen.
Q 12: How to Find out the Login and Password for the Input 192.168.1.1?
The standard username and password are the word “admin,” which we have already told you above. But sometimes the username and password could be a combination of words as the username could be “Admin,” and the password could be “Password.”
The network address and the menu access data, which is set by default, is mostly provided by the manufacturers at the back of the router.
Q 13: How to Set or Change the Password 192.168.1.1?
Step 1: After logging into the menu, search for “Wireless-security” section.
Step 2: Once, getting into the section, select “WPA2-Personal protection” and set a password of your choice before saving the changes.
However, there is one thing you should know. Entering the correct username and password makes the alternative method of resetting the router to default factory settings meaningless for some circumstances.
It could not be useful when you have forgotten the right password. Port forwarding or port triggering can help you to open some specific ports of the router. This option can be accessed by entering 192.168.1.1.
Troubleshooting Common Router Admin Page Errors
Q 1: How to Use the Router Password Recovery Feature?
By default, the username and password are “admin” and “password” respectively. But if you have altered the default settings and have set password security feature on then:
Step 1: Open the login interface at routerlogin.net or routerlogin.com. you can also make use of 192.168.1.1.
Step 2: When an “Authentication Required” dialog box opens, click “Cancel.”
Step 3: Now, a “Router password recovery” page will open where you will have to enter the router’s serial number. This number is present at the back of the router.
- Click “Continue,” and on the next page, you will have to answer the security questions you have set before.
- Click “Continue,” after this, your password will be recovered.
Q 2: I Am Unable to Gain Access to Router Admin Settings Page
There could be many reasons due to which you may not be able to open the router admin page. We have discussed some of the most common issues below.
Solution 1: Clear Browser Cookies and Cache
The methods could be different between different browsers for clearing the browser cookies and cache, so we have mentioned steps for some popular browsers.
Step 1: Google Chrome: Click on the three-dot symbol present at the top right corner of the browser, then select “More tools,” and in it, you will find the “Clear browsing data” option.
Step 2: Mozilla Firefox: Click on the three horizontal lines symbol from the menu, then go to “Preference” → Privacy and Security → Cookies and Site Data → Clear Data.
Step 3: Safari: From the top menu, select “History” then click on “Clear History.”
Solution 2: Try Logging in Through A Different Address
Apart from routerlogin.com, try logging in through IP addresses like 192.168.1.1. If that also doesn’t work, your ISP might have assigned a different gateway IP address.
Step 1: You can try connecting the Ethernet port directly to the device and try again if you are not able to access Wirelessly over Wi-Fi.
Step 2: The router page may not work if you are connected to VPN or corporate network. Disconnect that network and try accessing only connected to your NETGEAR router.
Step 3: If nothing works “Perform a factory reset” this will reset your router to its default settings. After this, login to the router configuration page and navigate to “Advanced” → “Router information.” You will also get the default gateway IP with the IP address.
Q 3: Routerlogin.net Not Working
Did you get the “you are not connected to your router’s Wi-Fi network” error? If you are unable to access the NETGEAR router login through routerlogin.net, you can try the tips given below to fix this “routerlogin.net not working” issue.
Step 1: First, remove all the cache memory of your browser and then once again try the NETGEAR router login page.
Step 2: Check if the router is getting sufficient power supply or not. Also, plug the router out for a while and then plug it in.
Step 3: Sometimes, the firewall doesn’t give access to the router login setup. If you have firewall settings for your computer or home wireless network, then the firewall could be hindering the process. Disable the firewall for your PC and later try to log in.
Step 4: Try using the default IP address 192.168.1.1 for accessing the router login page instead of the router login site.
Q 3: How to Configure a Netgear Router With Genie Smart Wizard?
You can use the smart wizard to configure the router for cable internet connection. First of all, connect all the devices which are the modem, computer, router properly with each other.
Then, open the browser and use the “router login IP” to get access to the setup page. Now, click on “Smart Wizard” and then to “Next button.” At last, check the Netgear router connectivity by clicking the router start option.
Q 4: What is the Default IP Address of the NetGear Router?
For accessing the Netgear router login portal, you can also make use of the default IP address. Many Netgear routers have default login IP as 192.168.1.1.
Q 5: How Do I Change My Router Admin Password?
Log into routerlogin.net and go to the “Advanced Settings” option. Now select the “Set Password” option. Enter the old password, and after that, the new one.
Type the new password again for security and then click the “Apply” button for saving the changes. Always make strong passwords that are difficult to guess.
How to Change Your Wi-Fi Name
Step-by-Step Guide
- Open Web Browser: Open your preferred web browser and enter the IP address of your TP-Link router, usually
192.168.0.1or192.168.1.1. - Log In: Use your admin credentials to log in. The default username and password are often “admin/admin.”
- Navigate to Wireless Settings: Once you’re in, go to “Wireless” and then “Wireless Settings.”
- Change the Name: Locate the “Wireless Network Name” or “SSID” field and enter your new desired name.
- Save: Scroll down and click the “Save” button to apply changes.
Resetting Your TP-Link Router Password
Forgot your TP-Link router password? Don’t worry, resetting it is straightforward:
Steps
- Reset Button: Locate the small reset button at the back of your TP-Link router.
- Hold and Wait: Press and hold the reset button for about 10 seconds using a paperclip or pin.
- Release: Release the button and wait for the router to fully restart.
- Log In: Use a web browser to access the router settings using the default IP address and login credentials.
Note: Resetting the router will erase all personalized settings, so you’ll have to reconfigure it afterward.
Setting Up Your TP-Link Wireless Router
Initial Setup
- Unbox and Connect: Remove the TP-Link router from its packaging and connect it to a power source.
- Ethernet Cable: Use an Ethernet cable to connect your modem to the router’s WAN port.
- Access Router: Open a web browser and enter the router’s IP address.
- Initial Setup: Use the default username and password to log in and follow the setup wizard for initial configurations.
Changing Wi-Fi Password from Your Phone
Yes, you can change your Wi-Fi password right from your smartphone:
- Download App: Download the TP-Link Tether app from Google Play or the App Store.
- Log In: Open the app and log in using your TP-Link credentials.
- Select Router: From the list of devices, select your router.
- Navigate to Wi-Fi Settings: Tap on ‘Wi-Fi settings’ and then on ‘Change password.’
- Enter and Confirm: Type in your new password, confirm it, and save the changes.
Conclusion
It is also essential to make sure your system is safe from hacking. If you are using the router with default settings, then there is some chance of hacking your system. After reading this article, you would have gathered sufficient knowledge about a wireless router so that you could connect the router with your PC.
Managing your TP-Link router is simpler than it seems. Whether you need to change your Wi-Fi name, reset your password, set up your router, or even manage settings from your phone, this guide has you covered.
With a little time and the right steps, you can easily customize your network settings to suit your needs. So go ahead, take control of your TP-Link router and optimize your connectivity experience.


