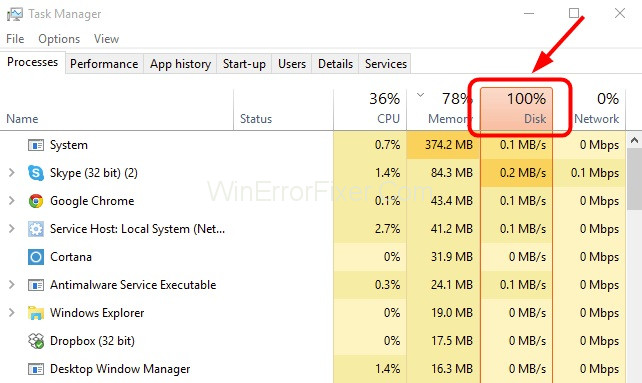
Something is causing your hard drive to overwork if your Windows 10 Task Manager shows 100%-disc utilization. The good news is that it’s usually not a difficult issue to resolve.
Windows 10 100% Disk Usage In Task Manager
Here are a few solutions that have helped other Windows 10 users cure their 100%-disc use issue. It’s possible that you won’t need to try all of them; simply work your way down the list until you discover one that works for you.
Method 1: Disable SuperFetch
SuperFetch aids in reducing boot time and increasing the efficiency of must-load apps. However, with Windows 8 and later versions of Windows, including Windows 10, it has been discovered as a possible source of disc performance concerns. Here’s how to turn off this feature:
Step 1: Press the Windows logo key on your keyboard, type the command prompt, and then select Run as administrator.
Step 2: At the User Account Control prompt, select Yes.
Step 3: The command prompt will appear once more. Fill in the blanks using the following command:
Step 4: On your keyboard, press Enter.
Step 5: If the above command isn’t working, try the following instead:
Step 6: Wait a few minutes to see if your computer begins to run more smoothly. Alternatively, you can look at your computer’s disc usage: In the Windows search box, type “task manager” and pick Task Manager. In the Processes tab, look at the percent at the top of the Disk column. You’ve solved the problem if it’s no longer 100 percent!
Method 2: Perform a Diskcheck
Step 1: Press the Windows key and the X key at the same time on your keyboard, then select Command Prompt (Admin).
Step 2: At the User Account Control prompt, select Yes.
Step 3: The command prompt will appear once more. Fill in the blanks using the following command:
Step 4: On your keyboard, press Enter, then write Y to confirm that you want the disc check to be performed the next time you restart your computer. Please make certain that you have closed all of your applications before proceeding.
IMPORTANT: Disk check will begin the next time you turn on your computer, and it may take some time to finish (could be a day for some). You can bypass the disc check if you don’t have time to wait for it to finish when you resume. However, you’ll need to reschedule it as indicated above.
Step 5: After you’ve finished the disc check, go back and look at your computer’s disc usage: In the Windows search box, type “task manager” and pick Task Manager. In the Processes tab, look at the percent at the top of the Disk column. You’ve solved the problem if it’s no longer 100 percent!
Method 3: Reset Virtual Memory
Virtual memory can be thought of as an extension of the physical memory on your computer. It’s a mix of RAM and storage space on your hard disc. When RAM is insufficient to complete a job, Windows will temporarily store files in virtual memory before swapping them back to RAM.
To clear virtual memory, follow these steps.
Step 1: On your keyboard, simultaneously press the Windows key and the Pause/ Break key. Then, on the left panel, select Advanced System Settings.
Step 2: Select Advanced, then Settings from the drop-down menu.
Step 3: Select Change… in the Virtual memory section of the Advanced tab.
Step 4: Untick the box that says “Automatically manage paging file size for all discs.”
Step 5: Choose your Windows drive (the hard drive or partition on which Windows is installed – commonly C:), and choose the Initial and Maximum sizes for your virtual memory:
Initial size — Depending on your computer, this figure changes. If you’re unsure what value to use, put whatever number you want in the Recommended category.
Maximum size – This number should not be set too high. It should be roughly 1.5 times the amount of actual RAM you have. For example, a PC with 4 GB of RAM (4096 MB) should have no more than 6,144 MB virtual memory (4096 MB x 1.5).
Click Set after you’ve input your virtual memory numbers, then OK to continue.
Step 6: Delete all ‘temp’ files on your PC. Press the Windows key and R at the same time on your keyboard, then type temp in the Run form and press Enter. This will open Windows Explorer with your Transient folder open, displaying all of your temp files.
Step 7: Select and delete all of the files in the Temp folder.
Step 8: Examine the disc use on your computer: In the Windows search box, type “task manager” and pick Task Manager. In the Processes tab, look at the percent at the top of the Disk column. You’ve solved the problem if it’s no longer 100 percent!
Method 4: Disable Antivirus Software Temporarily
If you have antivirus or anti-malware software installed, such as Norton, Kaspersky, AVG, Avast Behavior Shield, or Malwarebytes, you should temporarily disable or turn it off to check if it is causing your disc utilisation problem.
Please consult the documentation for your antivirus software to learn how to disable it. You might also find the following resources useful:
Windows Defender, Microsoft’s default anti-malware, should be noted. It’s turned on by default, even if you have additional antivirus software installed. Windows Defender is always there for you during that time period, even if you disable your other antivirus apps. So there’s no need to be concerned about temporarily disabling antivirus.
Check your computer’s disc utilisation once you’ve disabled your antivirus: In the Windows search box, type “task manager” and pick Task Manager. In the Processes tab, look at the percent at the top of the Disk column. If it’s no longer 100 percent, you’ve discovered the problem and should contact the antivirus software’s manufacturer for assistance.
Method 5: Fix Your StorAHCI.sys Driver
Due to a firmware fault, some Advanced Host Controller Interface PCI-Express (AHCI PCIe) models running with the current StorAHCI.sys driver may also cause the Windows 10 100% disc utilization problem.
Here’s how to figure out if this is your issue and how to remedy it:
Step 1: Select Device Manager by hitting the Windows logo key and the X key at the same time.
Step 2: Double-click the AHCI controller in the IDE ATA/ATAPI Controllers category.
Step 3: Select Driver Details from the Driver menu. You’re using the inbox AHCI driver if you find storahci.sys stored in a system32 folder directory.
Step 4: Click the Details tab after closing the Driver Details box. Select Device Instance Path from the drop-down option. Make a mental note of the path, beginning with VEN_.
Step 5: To open Registry Editor, type regedit in the Start panel’s search box, then press Enter on your keyboard. Then navigate to
HKEY_LOCAL_MACHINE\System\CurrentControlSet\Enum\PCI\ <AHCI Controller>\<Random Number>\Device Parameters\Interrupt Management\MessageSignaledInterruptProperties
The <AHCI Controller> here refers to the name you see from step 2).
The <Random Number> differs on different machines.
Step 6: Change the value of the MSISupported key to 0 by double-clicking it.
Step 7: After making the modification, restart your computer and check the disc usage: In the Windows search box, type “task manager” and pick Task Manager. In the Processes tab, look at the percent at the top of the Disk column. You’ve solved the problem if it’s no longer 100 percent!
Also Read: 1) 3 Easy Ways To Disable Windows Defender In Windows 10
2) How To Stop Windows 10 Update Completely
Method 6: Switch to ChromeOS
Windows is a technology that has been around for a long time. Windows 10 is a relatively new operating system, but it’s still the newest incarnation of a decades-old operating system that was created for a bygone era (pre-internet).
The entire Windows manner of doing things – with locally installed programs and local file storage – is completely outmoded now that we have the internet, fast connection speeds, free cloud storage, and limitless web apps (including Gmail, Google Docs, Slack, Facebook, Dropbox, and Spotify).
What’s the big deal about that? Because when you install unmanaged third-party programs on a regular basis, you’re inviting viruses and other malware into your system. (The problem is exacerbated by Windows’ vulnerable permission mechanism.)
Furthermore, Windows’ management of installed software and hardware has long been an issue. You can get ‘registry’ corruptions if your computer shuts down abruptly or if an application installs, uninstalls, or updates erroneously. That’s why, over time, Windows PCs slow down and become unreliable.
Because everything is installed and saved locally, it doesn’t take long to run out of disc space and fragment your drive, making things even slower and more unstable. The simplest method to solve Windows difficulties for most people is to uninstall Windows and replace it with a faster, more dependable, more secure, easier to use, and less expensive operating system…
ChromeOS is a Google operating system.ChromeOS is similar to Windows, but instead of installing a slew of programmes to email, chat, surf the internet, compose documents, give presentations at school, generate spreadsheets, and do anything else you’d do on a computer, you use online apps. There is no need to install anything.
Conclusion
If these approaches don’t cure your 100% disc use problem on your Windows 10 computer, you may need to consider replacing your hard drive. One last thing to try is to turn off any running automatic defragmentation processes, as they may be causing you trouble.
In general, your hard disc should never be at 100% utilization, therefore if it is, there is a reason for it. You must resolve the problem or risk an extremely slow computer.


