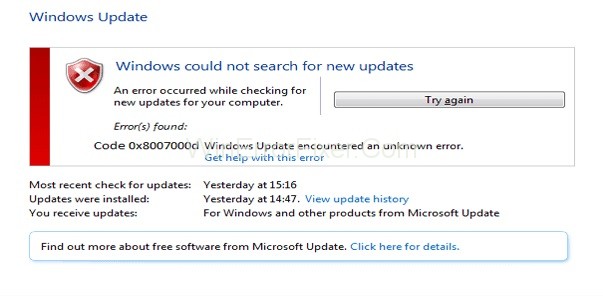
First of all, let’s see what this message is about, and why does it appear? The Error Code 0x8007000D is a very common error message which appears when we try to update our system or any other critical software.
Also, Error Code 0x8007000D appears when we start the updating procedure, and due to some reason, it does not completes and thus, leading to this error code to appear on the screen.
The Windows operating system is the most popular one and preferred all over the world by computer users because of its amazing features. But nothing is 100% perfect, so is the Windows operating system, which also has some disadvantages.
Some of the disadvantages of Windows include the error messages which pop up at any time and, thus, cause annoyance and hindrance in our work. In this article, we will talk about one such annoying error of the Windows operating system, which is faced by many of its users that is the error code 0x8007000D.
Usually, the reason behind this 0x8007000D is the tools assigned for updating the software, which one enables to get excess to some piece of software, causes this trouble. It might be due to do some corrupted files is present in the system.
Not only this error, but perhaps many other errors might also get triggered due to do any of the corrupted files in the system. Thus, it is essential to ensure the safety of our system, and hence, this will solve the majority of our problems related to the Windows operating system.
Now, let’s proceed further to the ways by which we can tackle this error message. No matter what is the level of our problems, there are always one or more ways available to handle it. Likely, this error code 0x8007000D is a very annoying and complex problem.
If you’re a Windows 10 user, you’ve likely encountered various error codes, one of which may be the 0x8007000D error. This vexing issue can disrupt your workflow and make simple tasks a nightmare.
In this SEO-optimized guide, we’ll explore what the 0x8007000D error is, its common causes, and how to clear your Windows 10 cache as part of the troubleshooting process.
What is 0x8007000D Error?
The 0x8007000D error is typically associated with system updates, data corruption, or configuration issues within the Windows 10 operating system. It can appear when trying to install Windows updates, activate the operating system, or while performing other tasks that require system verification.
This error is indicative of a malfunction that prevents the system from executing a process as it normally would.
Causes of 0x8007000D Error
Understanding the root cause of an error is crucial for effective troubleshooting. Here are the most common causes of the 0x8007000D error:
1. Corrupt System Files
Damaged or missing system files can cause a variety of errors, including 0x8007000D.
2. Incorrect File Format
If you are trying to play media files or view pictures, the 0x8007000D error may occur if the file format is not supported.
3. Windows Update Issues
Sometimes, the error appears when trying to install new updates. This may happen due to incomplete update files or problems with the Windows Update service.
4. Registry Errors
Registry issues could also be the culprit behind this error, especially if you’ve recently installed or uninstalled software.
5. Virus or Malware Infection
A compromised system may throw a variety of errors, including 0x8007000D.
How to Fix Error Code 0x8007000D in Windows 10
However, we have come up with some very simple ways which will take all your worries away and then you can update whatever you like.
Solution 1 – Using The Microsoft Windows Troubleshooter
The very first and of course very simple method is using the Windows troubleshooting feature to scan the entire system for finding the culprits behind any of the problems regarding OS and then we can fix those problems.
Thus, you can get rid of 0x8007000D error message by following some simple steps listed below:
Step 1: Firstly, open the Control Panel on your system.
Step 2: Then, click on System and Security.
(Alternatively, you can press Win + Q keys together. It will open a query menu where you can search for the troubleshooter. If in case, you did not find it, then you can download the troubleshooter on your system.)
Step 3: Click on the Update Troubleshooter. Followed by selecting the option fix problems with Windows update.
Step 4: Now, go to the Advanced tab and hit on the Run as administrator option. Also, make sure that you have selected the Apply repairs automatically checkbox.
Step 5: At last, wait for the process to complete as the troubleshooter will automatically scan for the issues and fix them.
This method will most probably fix the Error Code 0x8007000D. But if the error persists, then you can opt for the other methods discussed below.
Solution 2: Run Some Commands
This method includes giving some commands to your computer through a command prompt tool of your system. Now let’s see those magical commands that will fix your problem and will stop the Error Code 0x8007000D from occurring again.
Step 1: Firstly, type cmd in the search box to open the command prompt. Then right-click on it and select Run as Administrator from the menu list.
Step 2: After that, Copy and paste these commands into the prompt and press enter after each line.
DISM.EXE /ONLINE /CLEANUP-IMAGE /SCANHEALTH
DISM.EXE /ONLINE /CLEANUP-IMAGE /RESTOREHEALTH
That’s it. Now, these commands will run on your system and will stop the error 0x8007000D message from appearing again.
Solution 3: Reset The PC
Resetting your system is another better way of getting rid of 0x8007000D error. If it pops out again and again, even after using the Windows troubleshooting method. But before proceeding for this, we highly recommend you to backup all your important data to avoid any chance of losing it.
Also, you can opt for refreshing your system. It will prove to be a more efficient way and will help you to get rid of this problem. To refresh your computer follow the steps given below:
Step 1: Firstly, go to Settings → Change PC Settings.
Step 2: Then, go to the Update and Recovery Tab and press the Recovery option.
Step 3: After that, click on refresh your PC without affecting your files.
(In case you have updated your Windows 8 or 8.1 to Windows 10, then this will reset your update back to the previous Windows and eventually, you will have to update your PC again.)
Step 4: At last, proceed to refresh your PC by following instructions appearing on the desktop screen. It will boot back your computer to the same position as that when you started your PC for the first time.
Thus, you can now proceed for updating your Windows again without encountering the 0x8007000D error code again.
How to Clear Windows 10 Cache
Clearing the cache on Windows 10 can be an effective solution for fixing errors, as it removes temporary files that may be causing problems.
Method 1: Disk Cleanup
- Type “Disk Cleanup” in the Windows search bar and select it.
- Choose the drive you want to clean up, typically the C: drive.
- Select the types of files you want to delete and click “OK.”
Method 2: Manually Clear Windows Update Cache
- Stop the Windows Update service by opening Command Prompt as an administrator and typing
net stop wuauserv. - Navigate to
C:\Windows\SoftwareDistribution\Download. - Delete all the files in this folder.
- Restart the Windows Update service by typing
net start wuauservin the Command Prompt.
Method 3: Clear Browser Cache
- Open your browser’s settings menu.
- Locate the privacy or history section.
- Choose the option to clear cache and cookies.
Similar Posts:
- Error Code 0xc00d36c4 While Playing Videos or Music
- Windows Update Error Code 0x8024a105
- Windows 10 Update Error 0x80004005
- Windows Update Error 0x80070020
- Windows 10 Error Code 0x80070570
Conclusion
The Error Code 0x8007000D is nothing to worry much about and can be tackled very easily with this super easy and very efficient methods. You can opt for the one more suited to you. Hopefully, this article provided you with the best solution to your problem.
Thus, helping you to get away from your dilemma. The 0x8007000D error in Windows 10 can be quite annoying but is usually fixable with a bit of troubleshooting. The first step in resolving this issue is identifying its cause.
Once you know why it’s happening, you can take appropriate steps to fix it, such as clearing your Windows 10 cache.
Happy Troubleshooting!


